Friday, April 29, 2011

Tag - CottageCutz Nutty Squirrel

For a friend's birthday this year I decided to not give her the usual pack of greeting cards but instead chose to make her 20 tags. Little did I know what fun it would turn out to be!

I think most of us crafters have a container or two with images or dies cut but not used. Well, these come in so handy when making tags. I opened up one of my containers and could not believe how many of the images I could use.

For this tag I picked up a really cute CottageCutz die called Nutty Squirrel, the sentiment is from a Flourishes set called Tag Lines, the oval is a Nestabilities one and the tag is from Go Kreate - Rectangular Frilly Frame #3.

I initially thought I would not have enough of a selection of dies for tags, well, I was amazed at just what one can use, that plus the fact I really do have a lot of dies.

Wednesday, April 27, 2011

CottageCutz Cat Peeker

When describing CottageCutz dies to fellow crafters I tend to say if you enjoy jigsaw puzzles then you will love their dies.

This is a card I did for DH's birthday a while back using a Peeker Pocket which is also a CottageCutz die.  I did cut the pocket down as it was a little too large for the card.  The background papers are CM, the large scallops are from a SU Bigz XL die called Tasteful Trim and the scallop circle is a SU punch. I cannot even begin to remember where the sentiment is from as I do have quite a number of different companies stamps that I buy and I have quite a collection of sentiments.

Monday, April 25, 2011

Marij Rahder Suzy 4

I am enjoying the Suzy stamp sets and this one has Suzy in a bathing suit with various outfits and acccessories.  The images are also easy to cut out and simple to colour in.

For Suzy I used Copics with chalks for the blush on the cheeks.  This is the first time I have attempted black hair and I am delighted with the way it turned out.  For the dress I used Copics highlighted with a Spica pen and for the gloves I used Smooches and Lipstick Spica pen.

As this card was going to be hand delivered for a friend's birthday I thought a flower would be different.  I searched through my stash and could not see anything I liked so I created this one using the Magnolia DooHickey Poinsettia die.  I used 2 of the large flowers and one of the small.  I then curled the petals around a pen to give them a bit of shape and sprayed them with Shimmerz Spritz.  Once they were dry I curled them again and Distress inked the edges using Barn Door.  The leaves are from a Marianne D die called Frames / Leaves.

Suzy is matted on a yellow Nestabilities Oval, a black Nestabilities Labels Twenty-one, a yellow Nellies Multi Flower cut in half and a black Nestabilities Circle also cut in half.  The background paper is CM and the sentiment is Life Sentiments from Kaisercraft.

Friday, April 22, 2011

Peachy Keen Bunny Dolls Easter basket

This is the last of my Easter baskets so no more hiding chocolate from DH !  I have to hide the Easter eggs so otherwise they would slowly disappear.  The dog and I do not eat chocolate so it only leaves DH !

For this basket I used the Fancy Favor Stampin Up die and made the handle from a coloured pipe cleaner.  The yellow egg behind the bunny is a Spellbinders die called Nested Eggs which I sponged with Distress Inks.

The Bunny Dolls set comprises of 3 bunnies, a waistcoat, bowtie, Easter egg basket, a carrot and 2 sentiments.  This makes it easy to dress up the bunny which is what I did here.  All colouring was done using Copics.

Wednesday, April 20, 2011

Peachy Keen Easter Bunny treats

I used the same Mega Rectangle Nestabilites basket as I did for last Friday's post but this time they were for two little girls.  As I had just received the Peachy Keen Bunny Dolls set I thought this bunny would be perfect for the front.

The colouring in of the bunny was super fast with only bits of pink on the ears, cheeks and paws needed but the egg, which was paper pieced from iris folding papers, took a bit longer.  The bunny was also easy to cut out and I added a strip of green 'grass' from the MS icicles border punch which was trimmed down.

Monday, April 18, 2011

Tissue Paper technique with another Inkadinkado Down by the Seaside

Here is the last of the 3 cards I made using the tissue paper technique.  This Inkadinkado stamp was just perfect for the orange tissue paper and I think it makes a wonderful anniversary card for a male.

The card is pretty self explanatory, the only time consuming bit was me not wanting to get out the sewing machine and doing the stitching by hand. The sentiment is from a Flourishes set called Tag Lines.

Friday, April 15, 2011

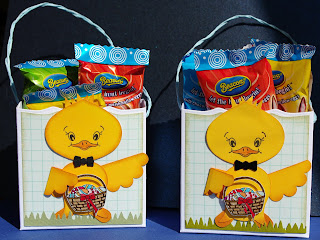
Easter Duck baskets

Not sure if there is such a thing as an Easter Duck, but I thought it would look cute for little boys rather than the pink girly bunnies.

The box is made from Nesties Mega Rectangles - 2 of them, laid landscape and scored at 1½" and 4½", then along the bottom, which is the longer side, score at 1".  On the bottom 1" side cut on the 2 vertical score lines up to the 1" mark and fold boxes in making 2 halves.  Tape and pop together.  For the handle I twisted some twine, punched a hole on either side and knotted the twine on the inside.

For the duck I was wanting to get my Cricut out to make it but as I was in an ankle brace and using 2 crutches that day I could not manage it by myself, so I went to plan B which was to make a duck up using punches.  Normally I would have a look on my computer to see whose design I could copy but I actually made this one up all by myself.  The recipe is as follows :


The bowtie is made with the remnants of the SU Spiral Border punch which you overlap.  I also sponged all the pieces and bent in the one wing to hold the basket.  The grass is my usual MS icicles border punch trimmed.

Wednesday, April 13, 2011

Easter Basket with SU Mini Milk Carton Die


I was after an Easter basket which I could die cut but it had to be a decent size.  As I had recently organised my SU dies I remembered the Mini Milk Carton one and realised I could use it by covering over the majority of the score lines using a decorative paper and joining 2 of them together.  When I cut the die on my Big Shot I did not use a crease pad so the score lines were not too pronounced.  The base of the die was angled into an octagon shape and taped down then covered over inside and out with a Nestabilies circle.

For the handle I hand cut a strip and decorated it with a piece from the SU Tasteful Trim die, the sentiment is also SU and the paper used was from a pad locally sourced.  The scallops around the top of the basket are also from the SU Tasteful Trim die.  I used Spun Sugar Distress Ink over the side and bottom folds as well as on the handle and scallop edge trim.

The bunny was one I found over at Rusty Daisy Studio - it bought a smile to my face when I saw it and it was so easy to make up.  DH came up with the idea of popping the bunny onto a strip of cardstock which had been scored half way. 

Monday, April 11, 2011

Punch Art Mouse

This card started off with me wanting to use the CottageCutz Peeker Pocket die.  I also wanted to copy a mouse I had seen on a blog, I think it was from Paper Punch Addiction's Kim Score.  I did not have the correct size circle punch for the outer ears so had to use Nesties circles which I think turned out better with the ridges.

The head is the SU ornament punch, the arms are also SU - word window punch, the face is from Peachy Keen's Wide Eyed and Bushy Tailed.

Background papers are CM and I used a MS border punch for the sides.  The sentiment is from SU as are the punches it is stamped on.  The bowtie is from my stash.

Friday, April 8, 2011

Punch Art Sheep

This card was cased from KB Papercraft for DH on the occasion of our wedding anniversary a couple of weeks ago.

The sheep are really easy to put together, the only different punch I used was for the ears - I prefer to use an ovoid punch as I think the ears look cuter.  I added a bit of bling to the female sheep and popped them onto paper from a FabScraps pad I have.  The dotty background paper is from the same pad.  The 'grass' is a MS icicle border punch trimmed - one day I will find a punch or die with the type of grass I am looking for !  The sentiment is from a Clear Dollar set called Thoughtful Notes.

Wednesday, April 6, 2011

Tissue Paper Technique with Inkadinkado Down by the Seaside

This simple card is made using the tissue paper technique I posted last week but this time with orange tissue paper on a white cardstock.

The image is matted on black paper and popped onto white cardstock embossed using the SU Square Lattice folder.  I used another layer of black paper before placing it all onto a white card.  The card was topped off with black buttons, orange embroidery thread and a couple of shell images from the same Inkadinkado stamp set.

Monday, April 4, 2011

CottageCutz / Peach Keen Design Tear Bear

I did not intentionally set out to see how many different companies products I could use on this card but it seems to have ended up that way.  The list is the following :

Bear - CottageCutz and it comes with Peachy Keen faces
Heart - CottageCutz Cat Peeker die
Sentiment - SU Congrats
Sentiment Die - Marianne D Creatables Frames
Small dog - Popcorn the Bear Bundle of Joy
Border Punch - SU Scallops
Pearls - from my stash
Colouring medium for dog - Distress Inks and an aquabrush
Background paper - Creative Memories
Blue paper - from the local stationers bought loose

Wow, even I did not think I had used that many different products !  Me thinks I have too many toys to choose from !!

Friday, April 1, 2011

Art Impressions Doorways & Shoppe Window Bakery


I have a booklet from Art Impressions with a whole lot of ideas on how to use their Doorways and Shoppe Window selection of stamps.  As I have a few of the insides of the shops to choose from I thought I would start off with the bakery to use on a birthday card for a friend.

Wanting to use Distress Inks to colour the images in, I cut a piece of watercolour paper one and a half times the size of the front of the card and then scored it on the left hand side.  This piece is folded over to make a flap like so :
                                     
The sentiment is a Hero Arts wooden stamp, the cupcakes are from Inkadinkado and are coloured in using markers and Spica Glitter pens.  The door panels are paper pieced and the bakery section on the front is coloured in using markers and Spica Glitter pens.  On the front of the card I masked the images and sponged around them using Distress Ink Antique Linen to give a paint look to the card.