Friday, January 29, 2010

GINA K DESIGNS - VALENTINE'S DAY HEART BOXES

This box design pattern was purchased from the Gina K site and is one of those really easy projects  to knock up a whole lot at a time.

Instead of using patterned paper to print out the design on, I choose to use plain and then cut small squares of patterned paper to decorate it.

I used Nestabilities hearts - classic and scalloped - to cut out on the front of the box and popped acetate to complete the window.  I also cut out a heart to put onto the top - remember to glue only on the left hand side to allow the box to be opened.

Wednesday, January 27, 2010


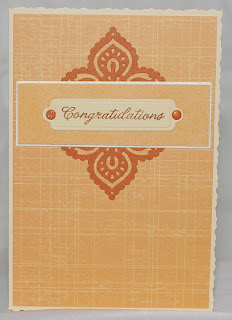
  SIMPLE CONGRATULATIONS    CARD

This plain and simple card is made with a CB die for the flourish and a large Nestabilities label using a sentiment from the Hero Arts 'Everyday Say' stamp set.  The background paper is CM.

The deckle edged card is one I bought years ago from a UK company but for the life of me, I cannot remember which one.  It makes such a change from the normal straight edged cards.

Sunday, January 24, 2010


             COLD GIFT PACK - PENNY BLACK TEDDY & COMPANY

The cardstock used for this project is SU Old Olive and I also used SU papers and border punch for the front decoration.

The Penny Black stamp is coloured in with Tombows for the teddy, on his jacket I used Smooches and for the flowers & grass, my SU markers.  I used Nestabilities labels to layer the image onto the patterned paper.

Inside I stuck down the pack of tissues with about 5 glue dots and for the lip ice I used the Crop-a-dile to punch 2 large holes a few mm's apart to thread the ribbon through.  As the ribbon did not hold the lip ice firmly in place I used 2 dimensionals (top and bottom of the lip ice) to adhere it to the cardstock.

The original idea for this project was found on Stampin Inspirations by Maria's blog.

Friday, January 22, 2010


PENNY BLACK - TINY WISHES

Scratching through my leftovers I found an embossed orange half circle and the ideas flowed from there.  For the background paper I smooched and swirled 3 Adirondack Acrylic Paint Dabbers - Butterscotch, Expresso and Terra Cotta - onto a piece of sand coloured cardstock.  The sentiment is a CB die, the die cut the hedgie is standing on is a BossKut one with both stamps being from Penny Black's Tiny Wishes.  The border punch used is from EK Success.

The cutting out is the hardest part but since using readers instead of my normal glasses, I no longer need the magnifying glass.

Tuesday, January 19, 2010


PUNCH ART CUPID (from the rear)

Ok, as the title reads, this cupid being viewed from the rear.  I got the idea from Ellen Kemper over at http://blinkthinkink.blogspot.com/ and decided to tweak it a little.

When I showed DH he immediately said 'you can't put that on a card' & 'where is his face'.  I was at a bit of a loss as I could not see what he was trying to get at.  Then he says 'he's rather obscene, isn't he !'  The penny dropped - he thought it was cupid from the front that that his arrow case holder was his ... (well, you know what I mean) !  Got a good chuckle out of that one !

Anyway, my middle aged cupid (from the rear) uses the SU ornament punch for his head, scallops for his tufts of hair, large CM large heart for his behind (partly scored for the cheeks), wings are the next size down CM heart, hand and legs / feet are a CM primitive heart.  The arrow case is SU word window and the arrows are cut from the Slice.  All the pink parts have been sponged with a pink ink.

Sunday, January 17, 2010


PUNCH ART - ALI BABA

This punch art figure is my own creation.  I had a couple of large vases stamped out and was looking to use them.  After all the Father Xmas figures I made at the end of last year I decided on an Arabian theme using the same concept and just went from there.  I used my Slice for his shoes, waistcoat and waistcoat decorations.  The face is one of the Peachy Keen stamps.

Details of my Ali Baba :  turban - SU ornament punch ; decoration on turban - small ovoid ; hair - SU scallop oval cut down ; face - circle ; ears - small ovoid again.  For the body I cut his arms using a combination of oval punches from SU ; hands are a hand punch ; pants - SU oval ; legs - SU word window.

The background paper is from CM, the jar stamps are Stampendous - Bold Vase, scalloped photo corners are EK success and the fancy scroll is a new CB die I recently purchased.

Thursday, January 14, 2010


BOSSKUT BEAR DIE

I have a couple of BossKut dies which are wafer thin and can be used in the Cuttlebug using the A, C & B plate sandwich.  The bear has been teamed up with a Cuttlebug embossing folder and sentiment.  The papers used are all from offcut packs bought from the Deckle Edge.  I did not like the eyes on the die so took the smallest eyes in my stash and stuck them on.

Apologies for the picture not being too bright but the flash on my camera is not working.  Have been out and bought a bigger flash so hopefully the next batch of photo's will look a bit brighter.

Wednesday, January 13, 2010


CUTTLEBUG EMBOSSING FOLDER

The background on this card is a Cuttlebug embossing folder with the sentiments also being a CB die.  The circles are Nestabilities and the booties are a BossKut die.


Sunday, January 10, 2010


CUTTLEBUG EMBOSSING FOLDER TECHNIQUE

This is a technique I saw on Stamp TV presented by Gina K.  It involves using a Cuttlebug embossing folder (one that is not too fussy) and a Memento dye ink pad.

Ink up the debossed (the top) side of the embossing folder, pop the cardstock in and run through the Cuttlebug.  The folder can then be rinsed under the tap to clean the ink off.

Pop onto a card with a sentiment - I used a SU punch and stamp on this card.

It really is so easy and very effective.  I did try it on the Paisley folder with not much success but then I only put it once through the CB whereas with this one I rolled it through twice.

Friday, January 8, 2010


CLEAR DOLLAR - CHARLIENE APRIL SHOWERS

I do love the Clear Dollar horse stamps.  On this one I did paper piecing on the brolly and wellies and coloured in the balance with my usual combination of markers. 

The grass is a wash using SU Certainly Celery ink and an aqua painter which was then stamped with AI teeny grass.  The trees are SU Lovely as a Tree, the clouds are AI and the raindrops (yes, I did go a little overboard here) are Clear Dollar.  The sentiment is SU on a background paper from CM and the card is one I bought ages ago from a UK company.

Wednesday, January 6, 2010


SWEET TREAT BASKET - GINA K. DESIGNS

This has to be one of the easiest and quickest gift baskets I have made.  It is also the biggest with plenty of space to pop a gift into.

The design was found on the Gina K. Designs website but when I went back to look for it again I could not find it.  Anyway, you cut a square of 8.5 inches x 8.5 inches, score at 2 inches along all 4 sides and cut down the score line to the next score line on 4 opposing corners (not sure if that makes sense but it is normally how you would make a box).  The handle is 11 inches x 1.5 inches.

You will be able to see how the basket is assembled - make the box part up first, attach the handle - I used a couple of brads (one for each side of the handle) - lastly attach the ovals or circles on the box part only as the handle needs to be free moving.  I used Nestabilities scalloped ovals and Hero Arts stamps.