Friday, January 29, 2010

GINA K DESIGNS - VALENTINE'S DAY HEART BOXES

This box design pattern was purchased from the Gina K site and is one of those really easy projects  to knock up a whole lot at a time.

Instead of using patterned paper to print out the design on, I choose to use plain and then cut small squares of patterned paper to decorate it.

I used Nestabilities hearts - classic and scalloped - to cut out on the front of the box and popped acetate to complete the window.  I also cut out a heart to put onto the top - remember to glue only on the left hand side to allow the box to be opened.

Wednesday, January 27, 2010


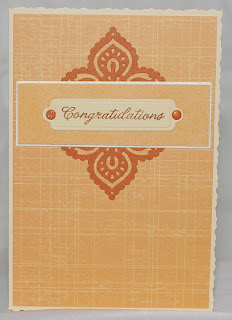
  SIMPLE CONGRATULATIONS    CARD

This plain and simple card is made with a CB die for the flourish and a large Nestabilities label using a sentiment from the Hero Arts 'Everyday Say' stamp set.  The background paper is CM.

The deckle edged card is one I bought years ago from a UK company but for the life of me, I cannot remember which one.  It makes such a change from the normal straight edged cards.

Sunday, January 24, 2010


             COLD GIFT PACK - PENNY BLACK TEDDY & COMPANY

The cardstock used for this project is SU Old Olive and I also used SU papers and border punch for the front decoration.

The Penny Black stamp is coloured in with Tombows for the teddy, on his jacket I used Smooches and for the flowers & grass, my SU markers.  I used Nestabilities labels to layer the image onto the patterned paper.

Inside I stuck down the pack of tissues with about 5 glue dots and for the lip ice I used the Crop-a-dile to punch 2 large holes a few mm's apart to thread the ribbon through.  As the ribbon did not hold the lip ice firmly in place I used 2 dimensionals (top and bottom of the lip ice) to adhere it to the cardstock.

The original idea for this project was found on Stampin Inspirations by Maria's blog.

Friday, January 22, 2010


PENNY BLACK - TINY WISHES

Scratching through my leftovers I found an embossed orange half circle and the ideas flowed from there.  For the background paper I smooched and swirled 3 Adirondack Acrylic Paint Dabbers - Butterscotch, Expresso and Terra Cotta - onto a piece of sand coloured cardstock.  The sentiment is a CB die, the die cut the hedgie is standing on is a BossKut one with both stamps being from Penny Black's Tiny Wishes.  The border punch used is from EK Success.

The cutting out is the hardest part but since using readers instead of my normal glasses, I no longer need the magnifying glass.

Tuesday, January 19, 2010


PUNCH ART CUPID (from the rear)

Ok, as the title reads, this cupid being viewed from the rear.  I got the idea from Ellen Kemper over at http://blinkthinkink.blogspot.com/ and decided to tweak it a little.

When I showed DH he immediately said 'you can't put that on a card' & 'where is his face'.  I was at a bit of a loss as I could not see what he was trying to get at.  Then he says 'he's rather obscene, isn't he !'  The penny dropped - he thought it was cupid from the front that that his arrow case holder was his ... (well, you know what I mean) !  Got a good chuckle out of that one !

Anyway, my middle aged cupid (from the rear) uses the SU ornament punch for his head, scallops for his tufts of hair, large CM large heart for his behind (partly scored for the cheeks), wings are the next size down CM heart, hand and legs / feet are a CM primitive heart.  The arrow case is SU word window and the arrows are cut from the Slice.  All the pink parts have been sponged with a pink ink.

Sunday, January 17, 2010


PUNCH ART - ALI BABA

This punch art figure is my own creation.  I had a couple of large vases stamped out and was looking to use them.  After all the Father Xmas figures I made at the end of last year I decided on an Arabian theme using the same concept and just went from there.  I used my Slice for his shoes, waistcoat and waistcoat decorations.  The face is one of the Peachy Keen stamps.

Details of my Ali Baba :  turban - SU ornament punch ; decoration on turban - small ovoid ; hair - SU scallop oval cut down ; face - circle ; ears - small ovoid again.  For the body I cut his arms using a combination of oval punches from SU ; hands are a hand punch ; pants - SU oval ; legs - SU word window.

The background paper is from CM, the jar stamps are Stampendous - Bold Vase, scalloped photo corners are EK success and the fancy scroll is a new CB die I recently purchased.

Thursday, January 14, 2010


BOSSKUT BEAR DIE

I have a couple of BossKut dies which are wafer thin and can be used in the Cuttlebug using the A, C & B plate sandwich.  The bear has been teamed up with a Cuttlebug embossing folder and sentiment.  The papers used are all from offcut packs bought from the Deckle Edge.  I did not like the eyes on the die so took the smallest eyes in my stash and stuck them on.

Apologies for the picture not being too bright but the flash on my camera is not working.  Have been out and bought a bigger flash so hopefully the next batch of photo's will look a bit brighter.

Wednesday, January 13, 2010


CUTTLEBUG EMBOSSING FOLDER

The background on this card is a Cuttlebug embossing folder with the sentiments also being a CB die.  The circles are Nestabilities and the booties are a BossKut die.


Sunday, January 10, 2010


CUTTLEBUG EMBOSSING FOLDER TECHNIQUE

This is a technique I saw on Stamp TV presented by Gina K.  It involves using a Cuttlebug embossing folder (one that is not too fussy) and a Memento dye ink pad.

Ink up the debossed (the top) side of the embossing folder, pop the cardstock in and run through the Cuttlebug.  The folder can then be rinsed under the tap to clean the ink off.

Pop onto a card with a sentiment - I used a SU punch and stamp on this card.

It really is so easy and very effective.  I did try it on the Paisley folder with not much success but then I only put it once through the CB whereas with this one I rolled it through twice.

Friday, January 8, 2010


CLEAR DOLLAR - CHARLIENE APRIL SHOWERS

I do love the Clear Dollar horse stamps.  On this one I did paper piecing on the brolly and wellies and coloured in the balance with my usual combination of markers. 

The grass is a wash using SU Certainly Celery ink and an aqua painter which was then stamped with AI teeny grass.  The trees are SU Lovely as a Tree, the clouds are AI and the raindrops (yes, I did go a little overboard here) are Clear Dollar.  The sentiment is SU on a background paper from CM and the card is one I bought ages ago from a UK company.

Wednesday, January 6, 2010


SWEET TREAT BASKET - GINA K. DESIGNS

This has to be one of the easiest and quickest gift baskets I have made.  It is also the biggest with plenty of space to pop a gift into.

The design was found on the Gina K. Designs website but when I went back to look for it again I could not find it.  Anyway, you cut a square of 8.5 inches x 8.5 inches, score at 2 inches along all 4 sides and cut down the score line to the next score line on 4 opposing corners (not sure if that makes sense but it is normally how you would make a box).  The handle is 11 inches x 1.5 inches.

You will be able to see how the basket is assembled - make the box part up first, attach the handle - I used a couple of brads (one for each side of the handle) - lastly attach the ovals or circles on the box part only as the handle needs to be free moving.  I used Nestabilities scalloped ovals and Hero Arts stamps.

Thursday, December 24, 2009


XMAS STOCKING GIFT CARD HOLDERS

Saw this template on the internet and decided to give it a go.  I have made 3 for Xmas this year and have put money instead of a gift card into each of them.  They are quite cute and fit into a square envelope.  If they were going to be hung on a Xmas tree I would have punched a hole on the top right hand side of the red flap, reinforced it with eyelets and put a piece of ribbon through it.

This will be my last Xmas post for the year.  Best wishes to all for the festive season, and to those travelling, take care and be safe.

Wednesday, December 23, 2009


PEACHY KEEN - WINTER PEEKERS & PHRASES

This is the second card done with my made up penguin.  This time I added a couple of snowflakes to match the pink stripe in the scarf.

The sentiment is a Hero Arts one and the label punch is SU Word Window.

Tuesday, December 22, 2009


PUNCH ART - SANTA IN CHIMNEY

Not too sure if I like this one or not.  The photograph was not taken in optimun light and is not great.  The chimney is made using the Fiskars hand squeeze brick punch adhered onto card stock then trimmed and the sack of presents is hand cut - I took a bit of cotton wool and stuck it underneath to puff out the bag.  My creative consultant (aka husband) advises for the next one I should make the chimney smaller and I think I will use the Nestabilities squares to see how that fits the bricks.

Monday, December 21, 2009


PEACHY KEEN - ICE SKATING PENGUIN COUPLE

Another adorable penguin stamp (yes, I like penguins !).  Again I cut out the image and popped it onto an iceflow - think it might be a Dee Greunig stamp.  Just had to try my other Martha Stewart corner and edge punch and seeing I actually read the instructions and watched the You Tube clip, I was able to use the corner punch on the front of the card.


SANTA GIFT BAG

Instead of trying to wrap up 2 liquid soaps for a gift, I decided to use one of the Merrypak paper bags again.  This time I covered it in SU Old Olive, topped the front with SU christmas paper, popped on one of the Santas I had made and added a sentiment which I had already stamped but not used, so have no idea which stamp set it came from.  The handle was cut from Nestabilities labels.

Sunday, December 20, 2009


PEACHY KEEN - SNICKERDOODLE GIFT ELF

Another Peachy Keen stamp.  I cut out the image and put it onto a mat on which I used the Martha Stewart corner and edge snowflake punches.  The secret to using these punches successfully is to take note of the size paper to be used as instructed on the insert (that would be the one I threw away and had to dig out of the recycling !).  The beige scalloped edge background paper is CM.

Saturday, December 19, 2009


PUNCH ART - SANTA IN CHIMNEY

The chimney is made with Fiskars brick squeeze punch - I think my bricklaying skills are not too bad !  The top of the chimney is an embossed paper.  Santa's legs and arm are SU Word Window punch with his hand being a cloud punch. 

The blue background paper is from our local store, The Deckle Edge, and I used my new Martha Stewart corner and edge snowflake punches liven the card up.  The dotted ribbon is also local and I glued on a couple of white snowflakes (the byproduct of the snowflake edge punch) to finish it off.

The sentiment is Hero Arts with the punch being from SU.

CUTTLEBUG -

I am not much of a sewer these days but as I had the machine out, I decided to have a bash at sewing cardstock.  I was pleased with the end result and would do it more if my machine was permanently out.

The Cuttlebug folder is rather plain on it's own so I embossed two, one in blue and another in white, using the white one for snow at the bottom.  With the white gel pen I highlighted the snowflakes in the sky as well as the roofs of the houses.  The white card in between the two red cardstock has also been embossed, this time with CB snowflakes.

Thursday, December 17, 2009


PEACHY KEEN - WINTER PEEKERS & PHRASES

I am new to Peachy Keen stamps and was delighted when the order arrived.  This stamp consists of the penguin head and scarf (in one stamp) and then the two hands (two stamps).

After colouring them in and cutting the shapes out I did not quite know what to do with them and decided  to make up a body.  It was so simple - I punched out 3 wide ovals, 2 in grey and one in cream, and the two feet are an EK Success punch scalloped edged photo corners.  Pop them altogether and you have a realistic looking penguin !

All my punch art attempts at penguins have been rather disasterous, so I was really delighted with this one.

The dotted background is CB Swiss Dot embossing folder with a blue chalk ink pad lightly rubbed over it.  The blue frame sponged with white ink is a CB die and the striped background is CM paper.  The sentiment also belongs to the Winter Peekers set.

Tuesday, December 15, 2009


STAMPIN UP - SNOWY PLAY

Not wanting to throw away the outer frames after cutting out a couple of Nestabilities deckle edged rectangles, I paired them up with a scrap piece of silver dot paper, popped on the skater which I had lying around and used a SU sentiment which was punched out using the SU Scallop circle.

I did cut the card down to size as it looks a bit odd being longer.

Sunday, December 13, 2009


PUNCH ART - SANTA IN A BOOT

After being a year in a boot from a broken foot, I made this card for the orthopaedic surgeon.

The boot is made from a sticky backed furry type paper which I have had for ages and have no idea where I bought it !  The background paper is SU with the ribbon being from a local source.

Friday, December 11, 2009


PUNCH ART - ANGEL WITH AN ATTITUDE

By now my sister has seen the picture, double checked she has come to the correct blog and gone "omg !!". 

I saw this punch art figure on http://blinkthinkink.blogspot.com/ and immediately thought "that is how I would look if I had to portray myself as an angel !" 

Most of the paper used is from scrap bins and the background paper is from CM.  The arms are perhaps the only puzzle - they are photo corners (EK Sucess punch).

Tuesday, December 8, 2009


PUNCH ART - GOLFING SANTA

DH (dear hubby) wanted a card for the golf club and as I am on a roll with punch art Santas I thought I would adapt one after seeing it on another blog.

The background paper is CM and the golf bag is from a retired SU set using paper piecing instead of colouring in the whole bag.  The hat is a Cuttlebug die and the shoes are hearts cut down with the spikes being the SU spiral punch using the actual punch outs upside down.

Sunday, December 6, 2009


ART IMPRESSIONS - GIANT SNOWMAN

There is a bit of a story attached to these cards.  One wintery Saturday afternoon in July this year I decided to try out my new snowman stamp.  Before colouring it in I wanted to see what his buttons looked like with blue Stickles but I squeezed the bottle too hard and a great big dollop came out onto a piece of scrap paper (fortunately).  Not wanting to waste it, I quickly stamped out another dozen images and used the all the Stickles up.  I coloured them all in which is easy once you have done the first one, popped them onto purple cardstock and embossed the white backgrounds.  Then I packed them away into my Xmas container.

This past weekend I was checking to see if I had made enough Xmas cards and found myself a bit short.  On going through the Xmas container I was delighted to find my hidden stash and vowed to do Xmas cards in July again next year !

Thursday, December 3, 2009


ART IMPRESSIONS - CHRISTMAS ELVES

This is a set of stamps from AI and I copied their idea for this card.  The elves are a bit fiddly to cut out but I think it is worth the end result. 

Wednesday, December 2, 2009


SARAH KAY - ROSALIE'S BICYCLE

I think I am getting the hang of colouring in Sarah Kay images.  The only thing I struggled with is the colour of the bicycle frame.  I tend not to take notice of them (have never been able to ride one !) and eventually used a gel pen to give it a bit of colour.

The image is stamped on watercolour paper and cut out using Nestabilities labels.  The rust and blue papers are CM and the border punch is EK Success.

Monday, November 30, 2009


FLOURISHES - SANTA - I BELIEVE

I had a couple of tries to stamp this Santa and eventually settled on using sepia ink.  The holly is coloured in using a blender pen to tone the colours down.

The red paper is CM with the buttons and embroidery thread being from my stash.  Initially I pricked the border and was going to leave it plain but decided on a fine red thread to match up with the stitching on the red paper.

Thursday, November 26, 2009


STAMPIN UP - TOP NOTE

Another card I found on SCS and decided to copy.  The background paper is SU as is the Top Note die used for the shoes.  I like this card for being different and not your normal Christmas card.

Tuesday, November 24, 2009


FLOURISHES - GERBER DAISIES

My new Flourishes stamps are really pretty and before I had a bash at colouring in the gerber daisies (which I had never heard of) I looked on Google images to see what colours they came in.

I used SU markers and a blender pen to get the desired effect and thought it would make a good sympathy card.