Thursday, April 29, 2010

 CLEAR DOLLAR - PIPPIN MOUSE FAMILY

This set of stamps has some really cute mouse figures and it includes the swing. I coloured in the image using Copics and as I only have a few I used a SU marker for the dress and finished it off with Smooches.

The purple background is a Nestabilities labels die, as are the ovals on which the sentiment is stamped.  The background paper is embossed with a CB folder and the mauve lace is from my stash.

Tuesday, April 27, 2010

PENNY BLACK - LETTERS & FLOWERS

When I chose this stamp from the catalogue I could see the possibilities and I must admit I am rather pleased with the end result.

Using a sepia ink I stamped the image onto a dull gold coloured piece of cardstock.  When trying new stamps I always reach for the scrap paper purchased from Deckle Edge.  It was so cheap that if I make a mess of it I have no qualms in tossing it into the bin.  I coloured the flowers in with a SU marker - Crushed Curry and sponged around the image with Distress ink.  I then put the image onto another piece of card (light gold) and finished it off with the SU border punch in brown.  The background stamp is En Francais from SU and the sentiment is also SU.

Monday, April 26, 2010

        HERO ARTS - WINE LABEL

This is a quick and easy way to give a bottle of wine as a thank you gift without making a card.

I used SU Rich Razzleberry cardstock with the patterned paper being my usual CM.  The stamp is Hero Arts Artistic Grapes and the sentiment is also Hero Arts.  I shaded the grapes in with Cranberry Dimensional Pearls.

To make the project I loaned a bottle of DH's wine, fiddled around with the measurements until it looked right, then cut a circle for the neck of the bottle using a Nestabilities die.  I used the Nestabilites Petite Circles Scallops and Classic Circles dies in patterned paper for the decoration around the circle.  Only then did I score the cardstock and measure out the patterned paper.  I think I will make the patterned part longer next time with the sentiment a little lower, otherwise I am rather happy with the idea.

Friday, April 23, 2010

HERO ARTS - GIFT BAG

Another example of a gift bag using the paper bags bought from Merrypak.

I used SU Barely Banana cardstock for this one - the SU cardstock is the right thickness for this sort of project.  The patterned paper was a freebie from a magazine and I used the Nestabilities Petite Scalloped Circles die in the centre.  The handles are also Nestabilities large Classic and Scalloped Circles.  At the four corners are dewdrops and the image is from the Hero Arts World Dolls set coloured in with SU for the kimono and Copics for the skin tones.

Tuesday, April 20, 2010


FLIPPIN STAMPS - FLIPPIN' MEN - PEACE

This is a card I made for my brother, Greg.  It is not always easy to find the right image for a male card but I ordered this one from the UK with him in mind.  He is a plumber so I thought the toilet would be appropriate.  The stamp has a back and front and I had a bit of a dilemma trying to fathom out how the images could best be displayed on a card.  Looking on the internet I found the idea of popping them onto acetate - like a clear window.  Here is the inside :

Monday, April 19, 2010

CLEAR DOLLAR - POST IT NOTE PAD HOLDER

As it is my brother's birthday this week I decided to make him a few examples of my hobby / passion / obsession.  I had not made post-it note covers for a while and, seeing they are quick and easy, decided to do one.

The cardstock is SU Creamy Caramel which is retiring soon.  It is one of my favourite colours so will have to stock up before the end of June.  The CB folder (just used on the front) is called Raindrops and the images are Clear Dollar- Lean on Me Charlie.  As per usual I used a variety of markers to colour the stamp in.  The sentiment is from the same stamp set and is cut out using a Nestabilities labels die.

Thursday, April 15, 2010

PUNCH ART - TWEETY PIE

I cased this cutie from my usual punch art inspiration site, Blinkin', Thinkin' & Inkin'.  It was surprisingly easy to make and I was fortunate to have all the SU punches it required. 

This card was for DH's birthday earlier on this week.  I was flat out of ideas with only a couple of days to go and thought punch art was going to be the easiest and quickest.

Wednesday, April 14, 2010

HIGH HOPES - SILLY GOOSE
GIFT BAG

With having bought a large amount of white paper bags, I am making a concerted effort to use some of them up.  This time I cut the bag smaller and used SU Creamy Caramel as the base colour.  The patterned paper is CM and the handle is made using Nestabilities scalloped and classic ovals.

The image - Silly Goose from High Hopes - is just so cute and it is one I have had laying around for a while.  At the base of the handles are dew drops.

Sunday, April 11, 2010


HERO ARTS - FERN

This is a new stamp bought locally and, at the same time, I bought the new colours of Distress Inks.  After watching a video on different techiques with Distress Inks I decided to use the two together.  Choosing 3 different colour green inks I randomly dabbed the image using the lightest green first, progressing to the darkest.  I then spritzed the stamp with water and stamped it onto watercolour paper. 

The sentiment is also Hero Arts and the watercolour paper is edged with Distress Ink.  I am not wild about the fern being horizontal and will alter it next time round.  Thought this would make a good sympathy card.

Friday, April 9, 2010


ANNIVERSARY CARD

A couple of weeks ago it was our 26th wedding anniversary and I had it in my mind to give DH a medal !  He has had a tough 16 months since I broke my foot and has really been wonderful (hope he reads this !). Anyway, I started off by using a Nestabilities clock die - I thought I could layer heat emboss it for a silver coloured shiny medal.  I was doing well until I burnt my finger on the heat gun which mucked up the medal and spilt the embossing powder all over the floor !  Needless to say, there were a few choice words uttered as I dashed off to the sink to put the finger under running water.

When I eventually went back to clean up the mess, the medal had cracked so, as I did not want to go through another heat gun session, I opted to use the Petite Circles Nesties on silver cardstock for the main label part.  The numbers are from a CB set and the wine coloured die at the back is a pendant Nestabilities one.  The background stamp is from Hero Arts stamped onto CM paper.

Now for the inside of the card :


You will note that "laundry" is not ticked.  This is because when I first broke my foot DH did the washing, put it on the racks and 2 hours later decided it must be dry - he did not check it.  When I voiced my concern I got the whole lot thrown on top of me whilst I was laying on the couch with my foot up in the air.  He was fuming and I could do nothing but laugh.  We both ended up with tears pouring down our cheeks from laughter and then he put the whole load back on the racks.  From then on, I did the washing on crutches hopping on one leg whilst hanging it up.  Laundry definitely does not deserve a tick !

Wednesday, April 7, 2010

STAMPIN UP - VINTAGE JUMBO WHEEL

With my last Stampin Up parcel I bought this vintage wheel and it has been sitting on my craft table ready to be used.  I do like using wheels but do not seem to have too much call for them.  Once I used it I realised the potential and thought a simple card would be best.

All the cardstock used is local from The Deckle Edge (the dirt cheap offcuts are ideal for card making).  The border punch is a freebie from SU and the birthday sentiment is Gina K Designs.  The flowers are also local and I am now veering towards using buttons on the flowers instead of brads.

Monday, April 5, 2010


HERO ARTS BACKGROUND STAMP        

This was such an easy card to make.  I used my new Hero Arts Aged Print Frame stamp onto a linen card.  I then searched through my stash and found the Sarah Kay - Lucy & Kitty image which I had already coloured in.  I popped the image onto the card on rises (thanks Cindy for the suggestion), added a sentiment and, voila !

In winter on the weekends, when the weather is miserable, I love to sit at my craft table and stamp a whole lot of images.  I then colour them in and pop them into a container ready to use at a later date.  It works particularly well with Xmas stamps and saves a lot of time.

Friday, April 2, 2010

        PUNCH ART - ANNIE

A young friend is in a school production of "Annie" and I thought I would make him a card for the occasion.

As it is only in June I have not yet made the card.  With the exception of the hands, which are from a small Fiskars punch, the rest of the young lady is made from SU punches. 

Ellen Kemper from the Blinkin', Thinkin', & Inkin' blog gave me the starting point and then I took it from there.

Wednesday, March 31, 2010

COUNTRY GARDEN - SUGAR NELLIE STAMPS

This is another stamp from Sugar Nellie which is quite cute.  The background paper is my usual CM with a yellow mat punched out using MS border and corner punches.  Then we have a couple of yellow Nestabilities ovals and in my wisdom I decided to stitch the back oval.  It was a bit of a mission but did finish it off.

The stamped image was coloured in using SU markers.  The sentiment is a SU one and the flower & button are from my stash.

Monday, March 29, 2010

CRAFTY INDIVIDUALS STAMP - BUTTERFLY

For this card I stamped the butterfly twice, cut out the second butterfly and glued just the body on top of the main stamp. I then used a rain dot on the head and Stickles on the body and tips of the wings for a bit of glitz and texture. The yellow mat is punched out using my favourite border punch of the moment - Scallop Trim from SU (and it was free) together with the corner punch.

The background paper is CM and the sentiment is SU Whimsical words punched out using SU Designer Label punch on a Nestabilities label background.

Thursday, March 25, 2010

  SYMPATHY CARD

Another of Gina K Designs new stamp set Lovely Labels.  Again, all I did was to add a sentiment, cut it out using the relevant Nesties label die, cut out a bigger one in a colour to match the ink and pop it onto a card with a CB border folder.

In case you are wondering about the bow - yes, I did tie it using my Bow Easy otherwise it would have looked like a dog's breakfast !

Wednesday, March 24, 2010

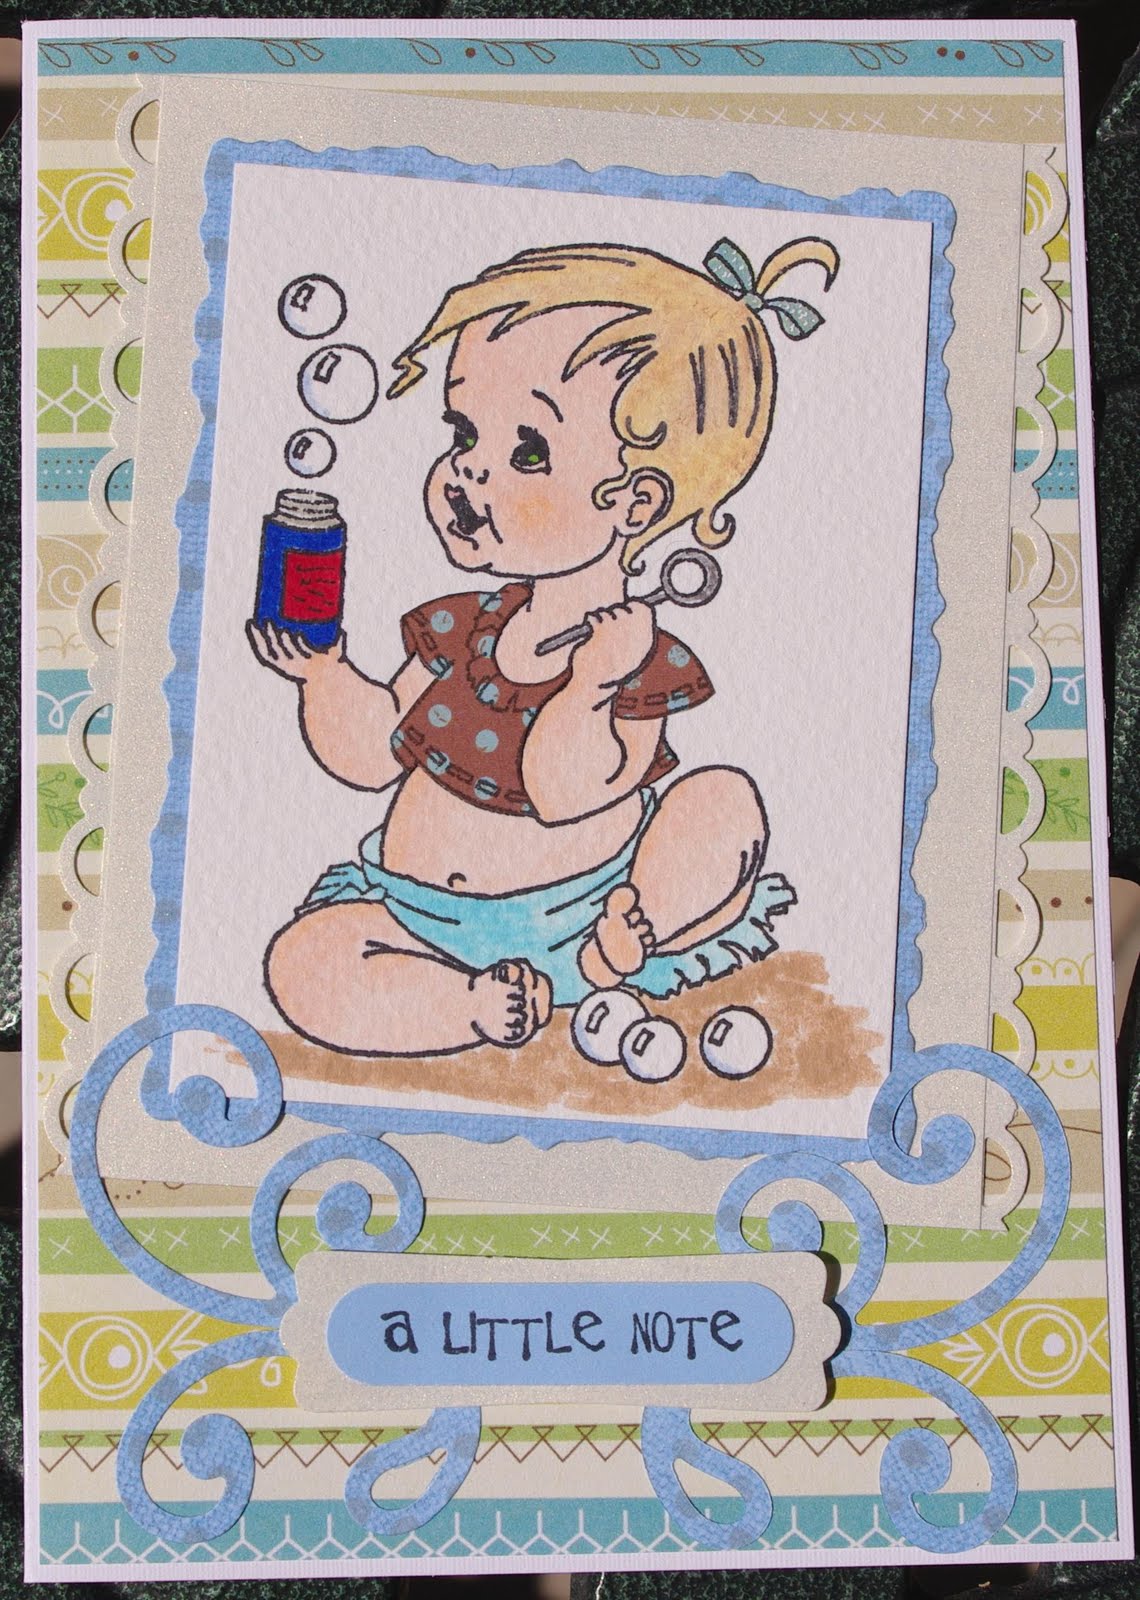
 BUBBLES by SUGAR NELLIE

When this stamp arrived I was a bit disappointed as it was not mounted and was a lot larger than I had anticipated.  Anyway, I gave it a bash and think it turned out rather cute.

The brown and blue top is paper pieced with the rest of the image being coloured in using copics for the skin and normal markers for the rest.  The blue backing is CM cut out using deckle edge Nestabilities rectangles, the cream paper is an offcut from The Deckle Edge and I used a SU border punch for the edges.  The blue scrolls are a SU Sizzlit die - Swirls Scribbles and the striped background paper is from a huge pad I recently bought (like I don't have enough paper already !!).

Monday, March 22, 2010

  SYMPATHY CARD

When the new Gina K Design Lovely Labels stamp set arrived I just had to try them out.  The idea is that the stamps match some of the Nestabilities labels.  All I had to add was the sentiment and a few bits and bobs and the card was done.

Friday, March 19, 2010

MALE BIRTHDAY CARD

Every now and again I feel the need to go back to basics and do a KIPS (keep it plain & simple) card.  You can use any border punch, the one used here is SU.  Then comes my favourite embossing folder - Swiss Dots and I layered a SU scalloped circle with different sizes of circles.  The sentiment is also SU.

The card is a SU colour which I had laying around from an eBay purchase and the brown and cream are from a selection of off-cut papers bought for next to nothing from the Deckle Edge in Cape Town. 

Friday, March 12, 2010

CARD PURSE AND CARDS

This idea was from a challenge I saw recently using a tutorial from Spiltcoaststampers   click here for tutorial.  The box is quite thin but holds 4 cards comfortably.  What is ideal is the cards are quick and easy to make as they are all the same design - just the sentiment changes.

I used craft coloured cards, a cream backing and then the patterned paper with a brad in each corner.  I had some cream card with holes in which seemed to go quite nicely and then added the SU 2 step bird punch.

The patterned paper was a 12 x 12 piece and was adequate for the whole project including the rear of the box.


Wednesday, March 10, 2010

HERITAGE ALBUM SCRAPBOOK PAGE - 1961

As can be seen, I am a very plain and simple scrapper.  I like clean lines and not a lot of fuss.  As the eldest in our family I have the job (not quite sure how I got conned into it) of scrapping the family history.  It is not easy to start scrapbooking with black and white photo's as I did, you soon discover what works and what doesn't.  For instance bright background colours do not work well. 

Yes, the little girl on her first day of school is me.  I am 5 years old and wearing a bright green (home made) school dress - thank goodness colour photo's were not around !  The dress was made too big and with a large hem so I could grow into it !

Monday, March 8, 2010

   DOG WITH AN ATTITUDE !

When I saw this dog on the Addicted to Stamping blog I knew I had to copy him.  Just love the attitude.

As luck would have it I had all the relevant punches, ovals for the ears and body, circle face, eyes and feet, hearts for the muzzle, nose and arms, SU Word Window for the neck and the new SU two step bird punch (branch) for the tail.  The grass is MS Icicles border punch and the background paper came free with a magazine ages ago.  The lettering is a CB alphabet die set.

This card is for a friend and will read inside "another Birthday !!!"

Thursday, March 4, 2010

     PURRR-FECTLY DELIGHTFUL

This image by Gina K Designs is so cute.  I used a combination of markers and Smooches for the stamp which was cut out and placed onto CM background papers.  The side panel is a CB embossing folder and the flowers are from my stash.

Not quite sure if you can see what I did on the scallop border punch - I punched 2 rows out and layered them one on top of the other.  Isn't it is amazing how ideas come to you when you look at your craft table and a couple of pieces of paper laying at different angles give you a 'light bulb moment'.  This happens so often with me and is how I came to layer the scallops.

Tuesday, March 2, 2010

       GET WELL CARD

I was commissioned by DH to make a card for a friend going into hospital this week.  A punch art nurse I had seen on the Blinkin', Thinkin' & Inkin' blog got the creative juices flowing and I went from there.

My nurse is a little chubbier and I used my Slice for the cap, dress, shoes and clipboard.  The rest of the parts are from various punches.  The legs and arms are made using an oval punch - so simple. The background papers are from a local scrapbook shop and the continous edge punch is SU.

It passed the DH quality test, so it means I must have done something right !

Monday, March 1, 2010


SYMPATHY CARD 

This card I cased from another blog.  I thought it was so simple, yet effective.  I used a CB embossing border folder down the left hand side (you can also switch the design around), took some CM paper, cut the elongated triangle and circle.  I found some ink which matched the paper and used it on the white circle then I stamped the SU sentiment.  Believe it or not, I could not find any flower in my stash to match so I had to use a couple of flower punches.

The card must have taken me under half an hour to make (including choosing the paper - always a bit of a challenge) and I was pleased with the result.  I do find sympathy cards difficult to make but this card, to me, is just right.


Thursday, February 25, 2010

MOTIVET - MORRIS SKIING

I made my first Xmas card of the year for a challenge which stipulated 2 layers, 3 buttons and glitter.  As it was my first challenge ever I thought it was one I could cope with.

The background paper was bought locally at The Deckle Edge, the background stamp is Magnolia Winter Night Background. the buttons and embroidery thread are from my stash and the border punch is an EK Success one.  The skiing moose is Morris from Motivet and he is stuck on with thin dimensionals to raise him off the background just a little.

The background stamp is coloured in using Copics, however, I messed up the mountains and ended up paper piecing them.  Quite a mission, but I thought it was worth it.  The moose is coloured in using SU crayons and the glitter part is Diamond Stickles on the rim of his hat.

Tuesday, February 23, 2010

PUNCH ART BUNNY

As per usual, I cased this idea from another blog.  Yes, I do sometimes have original ideas but it is just so much easier to look at other people's work for inspiration.  Anyway, the background houses are a SU wheel, the fence is from my Slice machine, the grass is a MS Icicle border punch (trimmed) and the leaves and flowers are from my stash.  The rabbit is made with SU punches and Nestabilities (the ears). 

Monday, February 22, 2010

  STAMPIN UP - FOREST FRIENDS

This card was originally white, sponged with Tattered Rose distress ink and stamped with a Hero Arts bamboo image.

The layers of papers are from bottom to top, CM, SU Close to Cocoa using the SU Top Note die, a pink paint swatch (picked up free from the local hardware store) with a design cut from the Slice and a Nestabilities Circle cut from white cardstock.  On the circle I took another circle I had cut from the Slice and used it as a template to sponge on the inside with distress ink.  Then the deer was stamped onto the circle.  It seems rather long winded but this card had been sitting on my craft table for quite a while giving me the chance to tweak it a couple of times.

Thursday, February 18, 2010

MILK CARTONS & HOLDER

This template was given to me and I was thrilled it turned out so well.  I used a locally obtained brown and yellow cardstock for the holder and cartons and CM papers (all from the same pack that is why they go so well together) to decorate it with.

The scalloped circle on the holder is SU as is the swirly image.  The sentiment is Penny Black.  On the cartons I sponged all the sides with Distress Ink and glued the papers on before assembling them.  On the top of the cartons I used an EK Success border punch with co-ordinating papers.  The labels are SU scalloped oval and plain oval and the wording is using a magnetic alphabet I have - think it is a Making Memories one.  I then punched 2 holes through the top and fed the raffia through.

When needed I plan to get some chocolates and nuts, put them into a celphane packet and pop them into the boxes.  The project can also be duplicated by making 2 holders and 4 milk cartons.  You can then glue the 2 holders back to back thus making it more stable as my ones need to be supported from underneath when you pick it up.

Wednesday, February 17, 2010

GINA K DESIGNS - TICKLE YOUR FUNNY BONE

This could well be me in a couple of years time !  I coloured in the image using Smooches and Copics and then cut it out.  The frame is from a my Slice and the papers are from my stash.

I recently went on a flower buying spree so decided I better start using some of them on my projects, hence the flowers.  Not too sure where the sentiment came from.