Showing posts with label Project. Show all posts

Wednesday, April 20, 2011

Peachy Keen Easter Bunny treats

I used the same Mega Rectangle Nestabilites basket as I did for last Friday's post but this time they were for two little girls.  As I had just received the Peachy Keen Bunny Dolls set I thought this bunny would be perfect for the front.

The colouring in of the bunny was super fast with only bits of pink on the ears, cheeks and paws needed but the egg, which was paper pieced from iris folding papers, took a bit longer.  The bunny was also easy to cut out and I added a strip of green 'grass' from the MS icicles border punch which was trimmed down.

Wednesday, April 13, 2011

Easter Basket with SU Mini Milk Carton Die


I was after an Easter basket which I could die cut but it had to be a decent size.  As I had recently organised my SU dies I remembered the Mini Milk Carton one and realised I could use it by covering over the majority of the score lines using a decorative paper and joining 2 of them together.  When I cut the die on my Big Shot I did not use a crease pad so the score lines were not too pronounced.  The base of the die was angled into an octagon shape and taped down then covered over inside and out with a Nestabilies circle.

For the handle I hand cut a strip and decorated it with a piece from the SU Tasteful Trim die, the sentiment is also SU and the paper used was from a pad locally sourced.  The scallops around the top of the basket are also from the SU Tasteful Trim die.  I used Spun Sugar Distress Ink over the side and bottom folds as well as on the handle and scallop edge trim.

The bunny was one I found over at Rusty Daisy Studio - it bought a smile to my face when I saw it and it was so easy to make up.  DH came up with the idea of popping the bunny onto a strip of cardstock which had been scored half way. 

Monday, March 28, 2011

Envelope Gift Bag

This is a project I saw Angie from Chic 'n Scratch do so I thought I would give it a go.  I had trouble finding the right sized envelope then wondered what I could fit in it.  What I did find was what I believe to be an A5 sized envelope (230 x 160mm) which worked really well. 

This is a really quick and easy project and it pays to watch the video Angie has made.  As my envelope was way too big to emboss I covered the front and back with paper instead.

The great thing about the size of this envelope is it comfortably fits 4 normal sized cards & envelopes in see through bags.  This makes a super thank you gift.

Wednesday, February 9, 2011

VALENTINE'S MUG

After using only the Scor-it for a couple of years I decided to buy a Scor-pal and must say I am delighted with the various projects that are available, this mug being one of them.  The instructions can be downloaded on the Scor-Pal site and it took more time choosing the cardstock for the handle than it did to make the mug.  The only deviation I made was to cut a circle for underneath the mug as I felt it was a little untidy and wanted to hide my mistakes !

The mug is made from a pad of sturdy cardstock I had in my stash, and for the handle I used CM and Nestabilities Circles.  The heart on the mug is a CM punch and the heart label is a Magnolia stamp.

Monday, February 7, 2011

VALENTINE'S BIRD HOUSE

A while back bird houses were popular but I could not find one I really liked.  After browsing through a Magnolia magazine I thought this one had potential and photocopied the pattern onto my cardstock.

The checkered pattern paper is CM with the rest being scraps from my stash.  The window opening was made with Nestabilities circles and petite scalloped circles finished off with a bit of acetate inside.  The little owl is a Go Kreate die called Owlet and he is standing on a branch made from the SU Two Step Bird punch.  The hearts on the roof are Nestabilities dies.

Under the hearts the roof is fastened with a velcro dot and lifts up to enable one to pop a gift or chocolates

Friday, December 24, 2010

RECYCLED XMAS PACKAGING

On a recent visit to a local market we came across a stall selling all sorts of different alcohol.  As we had not yet finished our Xmas shopping we proceeded to help the really friendly owners make their target for the month !

Anyway, as part of DH's Xmas gift I bought him a couple of bottles of Irish Whiskey which came in this box.  Of course the box started out very different but I did see the potential in revamping it.

I used black cardstock to block out all the writing and embossed each piece top and bottom with a CB swiss dots border folder.  The sentiment is a CB alphabet cut out using glitter paper and the image is Elf Oliver from Sparkle Creations stamped on watercolour paper and coloured in using SU watercolour crayons, Marvy and SU markers. 

On the top of the box I used Nestabilities Big Scalloped Squares alternating in black and orange and then I made a bow from ribbon which came from a conference we attended last year.

I just love recyling boxes and have to be really careful not to become too much of a hoarder.

Wednesday, December 1, 2010

CHRISTMAS MONEY HOLDER

When I saw the idea for a money holder on Cindy Lawrence's blog The Creative Closet I knew I had to give it a try. 

I altered the measurements slightly to 9½" x 7" for the base cardstock.  Score at 2" from one side and then at 3½" from the other side.  The wavy border punch is a MS one as is the border punch used on the inside.  I decided to cover the holder in some Christmas paper I had in my stash and then cut out 3 Nestabilities Labels Three.  The sentiment and the border stamp on the top label are from Waltzing Mouse and I used SU Close to Cocoa ink for both.
The bow is recycled from a gift previously received. 

This is the inside of the money holder.

Sunday, July 18, 2010

BOOKMARKS

We have quite a few bookmarks in the house and when we ran out the other day (both reading a number of books simultaneously) I decided to get out the laminator, raid my stash and make some up.

The duck is punch art with SU punches and the "You quack me up" is a Clear Dollar stamp.  The car is a Gina K Designs stamp placed onto CM paper.

The Asian dolls are Hero Arts and the circus train stamp is, I think, SU.  Not too sure as these were all stamped out and coloured in ages ago.  I know the lamination is not perfect but I am pleased to have a few more bookmarks available and it did not cost anything !

Wednesday, July 7, 2010

POST-IT NOTE HOLDER

Whilst browsing on the web the other night I came across this idea and remembered I had a few rectangle coasters in my stash.

The background paper is from my stash, the stamp is Girls Rule from Victoria Case Art Designs coloured in using Copic markers.  I did put a couple of magnet strips on the back but when I tried it out on our fridge DH managed to pull it down.  Why are men always so heavy handed ???  Anyway, he convinced me to add another magnet strip which means it will now never fall off the fridge !

Friday, May 14, 2010

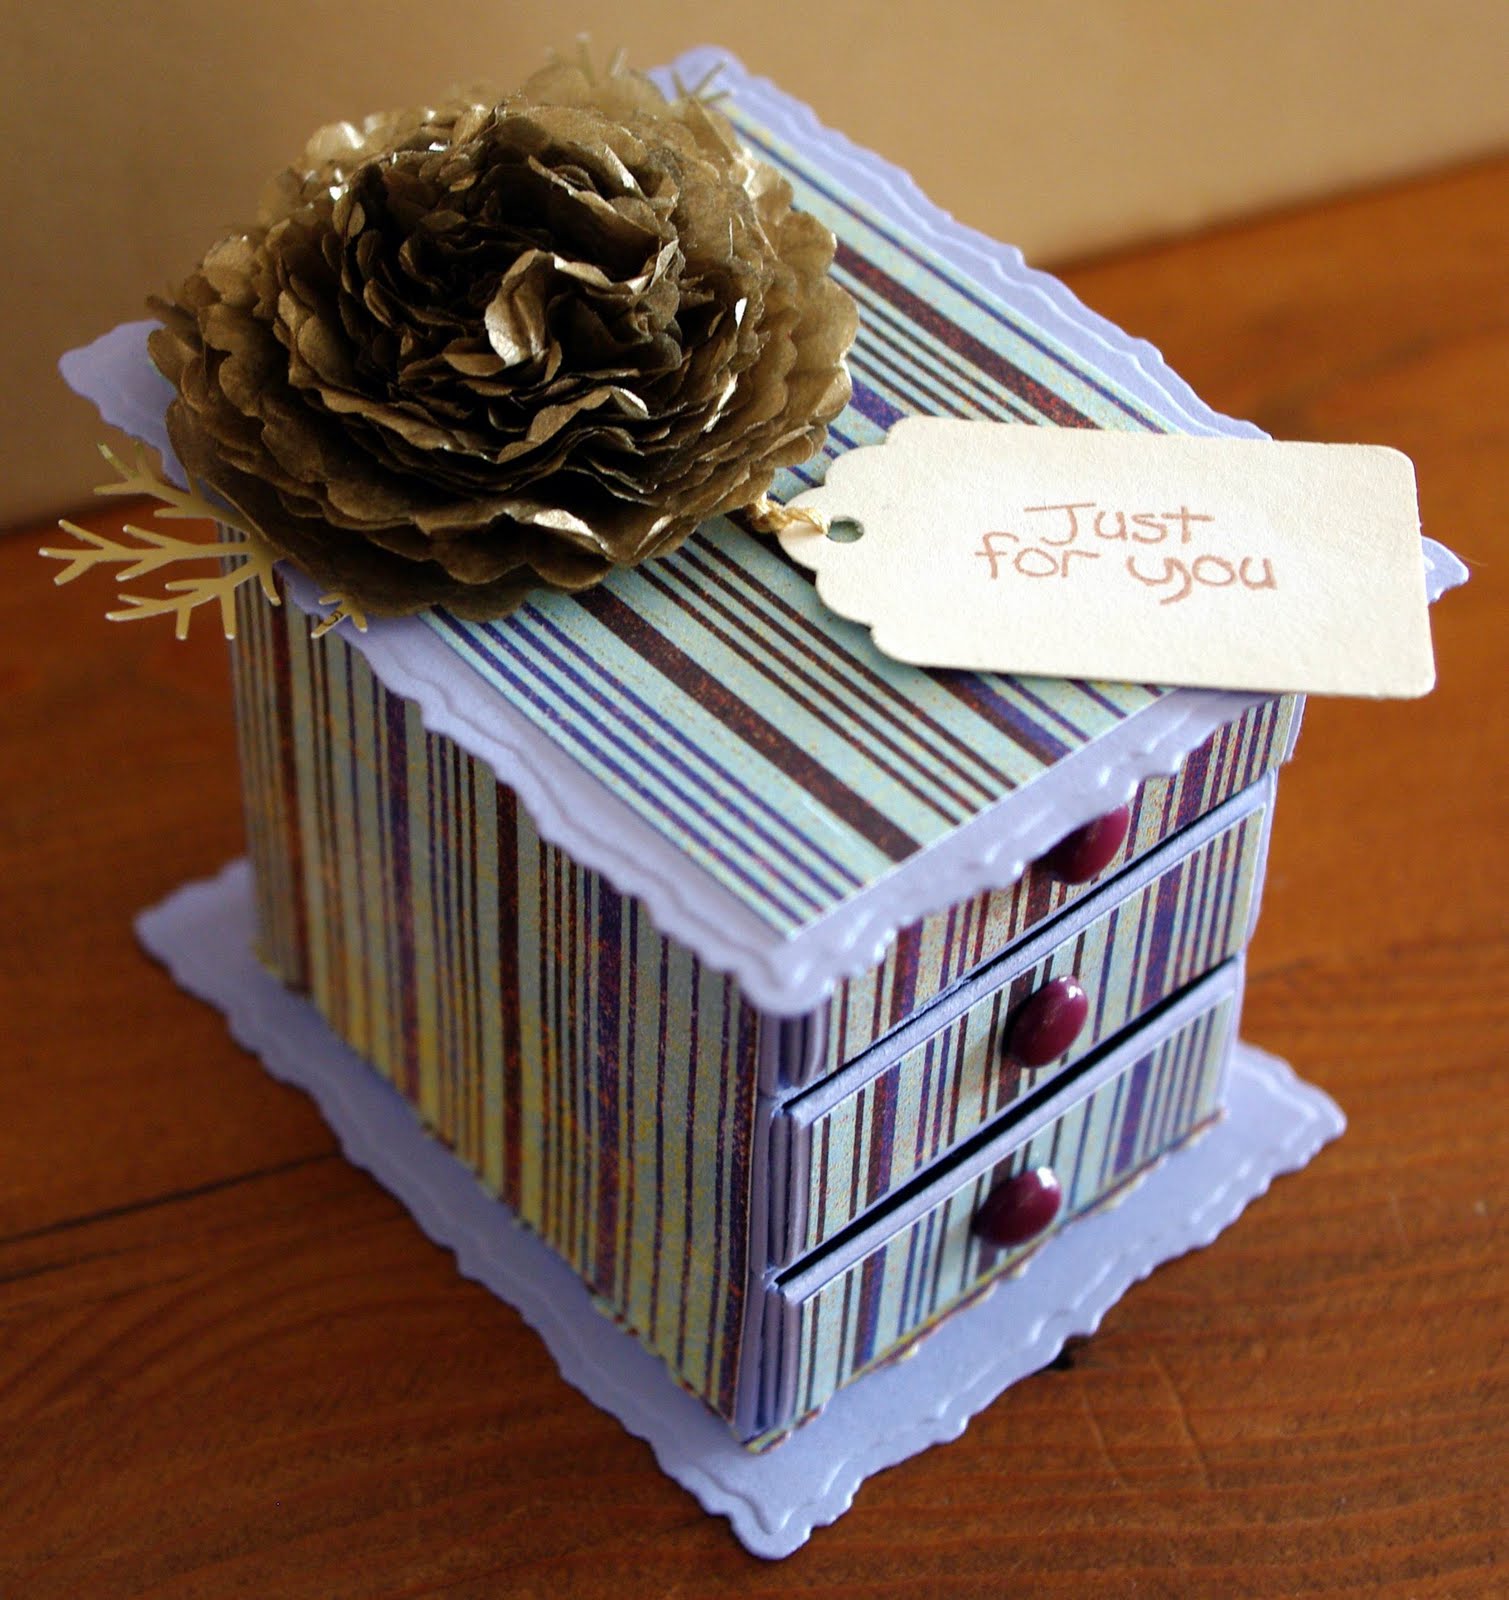
CHEST OF DRAWERS

When I saw these dear little drawers on the internet on the weekend I just knew I had to case them.  The site I found them at is Clearly iStamp - Katie Renz - the directions are very detailed and I was fortunate to be able to short circuit them as I have a Stampin Up Matchbox Die which I used for the 3 drawers.

The mauve cardstock is Stampin Up Clearly Amethyst, the striped paper is from my stash, the top and bottom are made from the Nestabilities Deckle Edge Rectangle die and the flower is assembled from scrap tissue paper using various size Nestabilities circles dies.  The 'handles' are large sized brads and the label is a punch which does not seem to have a name on it.

Thought this would make a really nice gift packaging if one was giving jewellery or anything small.

Friday, March 12, 2010

CARD PURSE AND CARDS

This idea was from a challenge I saw recently using a tutorial from Spiltcoaststampers   click here for tutorial.  The box is quite thin but holds 4 cards comfortably.  What is ideal is the cards are quick and easy to make as they are all the same design - just the sentiment changes.

I used craft coloured cards, a cream backing and then the patterned paper with a brad in each corner.  I had some cream card with holes in which seemed to go quite nicely and then added the SU 2 step bird punch.

The patterned paper was a 12 x 12 piece and was adequate for the whole project including the rear of the box.


Thursday, February 18, 2010

MILK CARTONS & HOLDER

This template was given to me and I was thrilled it turned out so well.  I used a locally obtained brown and yellow cardstock for the holder and cartons and CM papers (all from the same pack that is why they go so well together) to decorate it with.

The scalloped circle on the holder is SU as is the swirly image.  The sentiment is Penny Black.  On the cartons I sponged all the sides with Distress Ink and glued the papers on before assembling them.  On the top of the cartons I used an EK Success border punch with co-ordinating papers.  The labels are SU scalloped oval and plain oval and the wording is using a magnetic alphabet I have - think it is a Making Memories one.  I then punched 2 holes through the top and fed the raffia through.

When needed I plan to get some chocolates and nuts, put them into a celphane packet and pop them into the boxes.  The project can also be duplicated by making 2 holders and 4 milk cartons.  You can then glue the 2 holders back to back thus making it more stable as my ones need to be supported from underneath when you pick it up.

Sunday, February 14, 2010

GINA K. DESIGNS - STAMP TV - MEMORY KEEPER

After watching a 2 part video on how to construct this project I knew I had to give it a go.  It is a quick and easy box to make and perfect to keep photographs in until you are ready to scrapbook them.  Gina even offered a free template to download for a card you can use to journal relevant info on the photo's.

The main colour is SU Old Olive and the dotted paper is also SU.  I used Nestabilities labels in Old Olive and a yellow cardstock I buy in bulk.  I then punched out a SU scalloped oval and a normal oval.  The dolphin is from SU Silly Sealife and is coloured in using Copics which I think I am finally getting the hang of.

Thursday, February 4, 2010

VALENTINE HEART BOX

I saw this cute box on a blog and decided to copy it (something I'm rather good at !).  The hearts are all Nestabilities and for this project I used the largest and 3rd largest sizes.  The Valentine's stamp is a SU hostess set called Holiday Best and the flowers underneath on the largest red heart are from an Inkadinkado stamp set.  The box sizes are 1 x 4 and one eighth inch square and 1 x 4 inch square, both scored at 1" on all sides.  The larger of the boxes goes on the upper side.

I'm so proud of my bow which I made with my new Bow Easy.  Either you can make bows or you can't and I fall into the latter category with it always being very much a hit and miss affair.  With the Bow Easy (don't I sound just like the Shopping channel ?) my bows are consistently good, once I fathomed out the instructions and watched others on You Tube !

Sunday, January 24, 2010


             COLD GIFT PACK - PENNY BLACK TEDDY & COMPANY

The cardstock used for this project is SU Old Olive and I also used SU papers and border punch for the front decoration.

The Penny Black stamp is coloured in with Tombows for the teddy, on his jacket I used Smooches and for the flowers & grass, my SU markers.  I used Nestabilities labels to layer the image onto the patterned paper.

Inside I stuck down the pack of tissues with about 5 glue dots and for the lip ice I used the Crop-a-dile to punch 2 large holes a few mm's apart to thread the ribbon through.  As the ribbon did not hold the lip ice firmly in place I used 2 dimensionals (top and bottom of the lip ice) to adhere it to the cardstock.

The original idea for this project was found on Stampin Inspirations by Maria's blog.

Thursday, November 19, 2009


MATCHBOOK - ART IMPRESSIONS GIANT SNOWMAN

I wanted to make something different and quick with the AI snowman image I had coloured in and cut out before it got damaged.  This matchbook cover was perfect and after cutting and scoring I ran the front part only through the  CB using the Swiss dot folder.  Taking a white gel pen I highlighted the dots and stuck on the image.   The inside is a rectangle piece of cardstock concertina'd at both sides.  Ideally it should fit some sort of candy and I will have to take it to the local supermarket to see what works.  One could always make the whole project bigger and put a gift credit card inside.

Sunday, November 8, 2009


                        CHRISTMAS REINDEER GIFT BOX

Another one I saw on SCS and decided to copy.  The antlers are made on my Slice machine which I think I am finally conquering and the front and back are the SU Top Note die.  I always struggle with drawing freehand so the mouth was a bit of a challenge.  A small pot of Ranger Crackle Paint was close by so I used that as a guide and think the result was just the right amount of 'smile'.

I have made 4 of these for the neighbourhood children at Christmas.  Not too sure what will go inside the box but Cindy suggested using some brightly coloured tissue paper visible from the sides.  Thought that was an excellent idea.

Tuesday, November 3, 2009


                           CD PHOTO CUBE PROJECT

Recently received a mail advising of a workshop making this project.  As I am unable to go I decided to have a bash at it on my own and was delighted with the result.  The base is a bit of a problem, but I am working on it. 

We have loads of old CD cases from computer backups no longer needed and in no time at all I had taken the insides out, unhinged the cover and swung it around and assembled all 4 which clipped into each other.  I dug out some old family photo's (yes, Debs, it really is you, think you are about 19) and used some new CM paper which I had just bought.

The cube sits on my craft desk full of work in progress.  Every couple of days I turn it around and smile.  They might not be the most flattering photo's but they bring back so many memories !