Friday, April 20, 2012

Cottage Cutz - Watering Can, Tulips

I am a huge Cottage Cutz fan and when I saw this die I knew I had to get my hands on it.  I decided to cut out the entire die in white and coloured in the pieces using Copics.  Yes, I know I copied their suggested colours but it really is a good combination.

The die behind the tulips is a Nestabilities Square matted on a Marianne D Square.  I think the sentiment is a Gina K one (not sure) but it is stamped on a Whimsy Notables 2 die.

Wednesday, April 18, 2012

Unknown Venetian Scene stamp

I recently needed a 21st male birthday card and as most of my stamps are cute and whimsical I struggled a bit.  Tucked away I found a couple of stamps I bought years ago but have no idea of the company name.  This Venetian scene was amongst them and I thought it would be appropriate.

The sentiment is from a Clear Dollar stamp set called Something to Crow About.  Using a Spellbinders Labels template (made from an old x-ray) I sponged around the outside of the card using Distress Ink.

Monday, April 16, 2012

Stampin Up - Owl Punch

The SU Owl punch is one of my all time favourites as it is quick and easy to make up.

For this card I die cut a circle and used the negative to sponge in the moon.  I put the circle onto the sponged image and  used a dew drop Momento ink pad called London Fog for the rest of the card.  At the bottom I took a roughly torn Post-it note to create a border whilst dabbing on the background with the ink pad.

The owls are standing on a die called Marianne D Forest Branch.  I enjoy using dies and find the Marianne D range innovative and very precise.  A pleasure to work with.

The sentiment is from the Flourishes stamp set called Tag Lines.

Friday, April 13, 2012

Easter Treat Box - Peachy Keen Easter Basket Paint Fight

This treat box is also from a template called Bag 'N' a Box by B-C-E (Uk) Ltd.  Because I was not paying attention I made an error when I tried to make it taller but I just altered the design at the top of the box.  As they say, in craft there are no mistakes, only creative opportunities ! 

The window is cut out using Nestabilities Long Rectangles, Plain and Scalloped and the Peachy Keen image was coloured in using Copics.  There are a couple of cute paint splatter stamps in the set but I could not get the right colour ink to use on the Copics.  I topped off the project with blue pipe cleaner handles.

Wednesday, April 11, 2012

Punch Art Easter Bunny Treat Bag

This treat bag is from a template by B-C-E (Uk) Ltd called Bag 'N' a Box.  I did alter it slightly to make it taller.

The bunny is made from a variety of SU punches and topped off with a Peachy Keen face and Candi buttons.  In case you are wondering about the head - it is the SU ornament punch trimmed and used upside down.  The trim on top is from a Spellbinders Classic Edges One die set - except I used the part usually tossed out.  The aperture is cut out using Nestabilities Labels Ten.

Monday, April 9, 2012

Sizzix - Big Shot Pro Hexagon die

I must confess I love the Big Shot Pro dies for boxes.  On this box I used the Magnolia grass again as well as a small Easter stamp I was given as a gift many years back.  I think it might be a very old SU one as it is made of foam.

Friday, April 6, 2012

Stampin Up - Fancy Favor die with punch art Bunny

I find the SU Fancy Favor die a good size for Easter treats and quick and easy to assemble.  To the front of the box I added Magnolia grass and a punch art bunny which I have done before.  The punches used are all SU and it is easy to assemble.  The handle is made of raffia which has been twisted.

Wednesday, April 4, 2012

Easter Gift Bag - Shower Peepers

This Easter treat bag is made using the Big Shot Pro die called Tall Bag.  I used Nestabilities Eggs to cut out an aperture and popped in a chick from the Cottage Cutz / Peach Keen die called Shower Peepers.  The chick is holding a small Nestabilities Egg.


Monday, April 2, 2012

Penny Black - Pansy Bunny

Often when I buy a new stamp I will try it out and put it one side in a container.  I did it with this image and thought it would do for a quick Easter basket.

If I can recall I stamped the image onto watercolour paper and coloured it in using SU watercolour crayons.  The box is the SU Fancy Favor die and the grass at the bottom of the image is from a Cottage Cutz die called Kitty Love Mail.  The handle of the box was made from a couple of lengths of raffia twisted.

Friday, March 30, 2012

Cottage Cutz - Spring Chick-a-dee

A couple of days ago I suddenly realised Easter was nearly upon us and I had not done any projects.

I looked on the internet and found a template for this bag at Mel Stampz blog (Flat Top Purse)  and used SU cardstock with a pink basil trim made from Edgeabilities Classic Scallop.  The label is a Boss Kut tag and the punch art is the delightful Cottage Cutz Spring Chick-a-dee.  This time I used white cardstock for all the pieces except for the hat and coloured them in with Copics.  A good idea except for the tiny pieces which ended up being quite fiddly.

The recipient of this gift is allergic to chocolate, as I am, so I had fun filling the bag with carob sweets - at least I could pinch a couple.

Wednesday, March 28, 2012

Penny Black - Enjoy Life

Another card using the masking technique from Heather Telford's blog called Bits & Pieces.  This time I blocked off the sections and used Distress inks.  I then used a wooden Hero Arts script stamp on the blue and the green section after which I stamped the tree from the Penny Black set Enjoy Life.  Cannot remember where the sentiment came from. 

Monday, March 26, 2012

Marianne D - Classic Boats die

With having a fair stash of paper and cardstock I am trying to use up the sheets I have already cut. Problem is I never know the name of the paper.  Most of my stash is bought locally which limits it to a few suppliers like Bo Bunny, Fab Scraps and Kaisercraft.  On this card I also use a left over piece and to it I added the Marianne D Classic Boats die, shaded with Distress Inks.

The waves are an old Fiskars border punch, the stitching is with a white pen and the sentiment is from a Stampin Up set.

Thursday, March 22, 2012

Inkadinkado stamp set

I have a number of different coloured cards which I bought a long time ago on eBay which I thought I should start using.  I think this one is from SU cardstock and it came with a spare piece of the same colour which was much appreciated.

The background paper is another leftover from a project and I cut it into 3 parts.  Truth be told, it was a bit too small for the card so I thought I would make it fit.  The bird and foliage stamp is from an Inkadinkado set I bought years ago and it has no name on it.  I used a SU white craft inkpad for the image which I matted onto a Tim Holtz Artist Trading card die.

Wednesday, March 21, 2012

Flourishes - A Season of Celebrations

You may be wondering why on earth I am posting a Christmas card in March !  Well, I am making up a set of cards as a gift for a friend and decided to pop in a couple of Christmas cards as well.  They will all be the same type of card - see the wonderful blog of Heather Telford - Bits & Pieces for her inspirational cards using a sponging and masking technique.

For this simple card I masked off an area with Post-it notes and used a brayer and Archival Ink for the background.  I then stamped the image from the Flourishes A Season of Celebrations set using Black Archival Ink.  I used Spica pens for the dress and lights just to add a little bit of colour.  The sentiment is from the same set.

The brayer works better on a smooth cardstock.  I will also be trying this technique using sponges on my preferred surface of a linen card.

Sunday, March 18, 2012

Hero Arts Sizzix Classic Frame die

I am loving the new Hero Arts dies and when I realised that the Nellies Rectangle die fitted into the Hero Arts Classic Frame one I was well pleased !

The background paper is also left over from a recent project and the sentiment is from a Gina K Designs set called Inside and Out.

Thursday, March 15, 2012

Hero Arts - Remember

The background paper on this card was leftovers from a project.  I just added a brown Hero Arts / Sizzix Scallop Frame die and a beige Rectangle Frame die.  The sentiment is also Hero Arts - Remember stamped in Archival ink Coffee and the edge has been Distress inked.

I seem to be using a lot of Hero Arts lately - it is because we are able to get their products here in Cape Town, from Ronita at Simply Creative.  I am loving their new stamp / die combination sets - lots of potential.

Tuesday, March 13, 2012

Hero Arts - Type

I was after a masculine birthday card and have recently seen a number of Stampin Up sites using a typewriter stamp.  As I have a Hero Arts typewriter stamp set I thought I could use that instead.

The background paper is from a large pad I bought ages ago, the circles are cut from Spellbinders large and small circle dies.  The sentiment is from the same Hero Arts Type set and I handmade a banner for it.

Sunday, March 11, 2012

Hero Arts - Simple Things - Mountain Card

A while back I managed to get a couple of templates at a craft show in the UK.  This one is called Stencillos Mountain Card Template.  Yes, I know it is fairly easy to go online and fathom the card out but to have a template makes it just so much easier.

The house is from the Hero Arts set called Simple things coloured in using Distress ink, markers and paper piecing for the blinds.  The clouds are a die from CC Designs, the fence is a Cottage Cutz die called Picket Fence, the grass is a Magnolia Doohickey die (no name on the packet) and the dog is a Kaszazz stamp called Flat Out.  The sentiment is a Go Kreate die - Caption #2 Happy Birthday.  This time I got clever and cut the sentiment out of sticky back paper - no fiddly glueing !!

Apologies for the break in posting but we had floor tile problems which meant loads of cement dust everywhere.  More mess to come this week, makes me want to run away !

Sunday, March 4, 2012

Hero Arts / Sizzix Stamp & Emboss - Postage & Frame Set

I recently bought this new Hero Arts concept from Simply Creative here in Cape Town.  I do like the idea of a stamp and emboss combo and Sizzix seem to have gotten the embossing folder correctly lined up unlike some of the Cuttlebug cut and emboss folders.

Using Sepia Archival ink I stamped the image and then embossed it.  I lightly went over part of the image with a couple of Distress inks and popped the sentiment stamp in the label area.  The sentiment is from Kaisercraft - Life's Sentiments and reads "a journey of a thousand miles begins with a single step".  I thought it was a fitting sentiment for the stamp.

Thursday, March 1, 2012

Flourishes - Medallion Motif

Working off another page map idea I thought I would use this Flourishes stamp set.

The background is from a free paper pad by Stampin up and I tried to match the ink by using SU Brocade Blue.  Not sure if it was the right choice.  I cut out part of the image and matted it onto 2 circles made using the Creative Memories cutting system.  The middle circles are from Spellbinders and the sentiment is a Clear Dollar one called Birthday Wishes.

Tuesday, February 28, 2012

Quick & Simple Card

This is another card made using a card map.  I took a black card, topped it with Creative Memories patterned paper and used half of a Go Kreate Large Frame / Frilly #2 die cut out of black paper.

I finished it off with a vertical piece of patterned paper and black bow.  The sentiment is from the Stampin Up set called On Your Birthday and it was die cut using Clear Dollar Tabs and Tags.

Sunday, February 26, 2012

Stella & Rose - Mabel "So Sweet" Stamp

I have never really looked at or followed card sketches but after seeing an idea for a card sketch book I thought I would look into it.  Becky Fleck's Page Maps are a wonderful source of inspiration and the card today is from one of her card sketches.

The background is a new Hero Arts Stamp called Newspaper Background which I stamped using Sepia Archival ink.  On the mustard colour piece of cardstock I pierced the stitch holes using a Stampin Up template and did faux stitching with a brown Momento marker.  A Stampin Up scallop border punch was used for the right hand side trim.

The birdcage stamp is from Stella & Rose - Mabel "So Sweet" and the bird is from an Inkadinkado set.  I used Staz On ink for both of these stamps.  After die cutting the image with Spellbinders Petite Scalloped Circles I extended the chain on top of the birdcage drawing ovals by hand.  The sentiment is from a Stampin Up set called On Your Birthday and I stamped only the bottom part of one of the stamps.  It was die cut using a Sizzix / Hero Arts die called Small Tag Frame which I bought earlier on this week from Simply Creative here in Cape Town.

Thursday, February 23, 2012

Kaszazz - Hibiscus Border

After putting my Copics one side for a while I thought they might be ideal for this Kaszazz image.  I am quite pleased with the way the colouring in turned out.

I used an ivory coloured card, topped it with a sticky mesh which I found in my stash and finished it off with a Cuttlebug sentiment and border.  The image was easy to cut out and I am happy with the finished product.

Tuesday, February 21, 2012

Kaisercraft - Duchess Clear Stamp

I do not have much in the way of Kaisercraft stamps but when I saw this one over at Simply Creative I thought it may have potential.  Using maroon Archival ink the image stamped out first time.  I then die cut it with Spellbinders Labels Twenty.

The sentiment is from Gina K Designs Tag Lines set and it was die cut with Clear Dollar dies.

Sunday, February 19, 2012

Flourishes - Kids Play - boy

This card has been on my desk for a while now.  I am not that wild about it but at the moment I have no other finished project.

Using the Flourishes Kids Play set and black Archival ink I die cut the image with a couple of Spellbinders Circles.  The sentiment is from the same Flourishes stamp set and it was die cut with Clear Dollar Tabs and Tags.  I thought the water could do with a bit of colour but got a little carried away with the shade.

Thursday, February 16, 2012

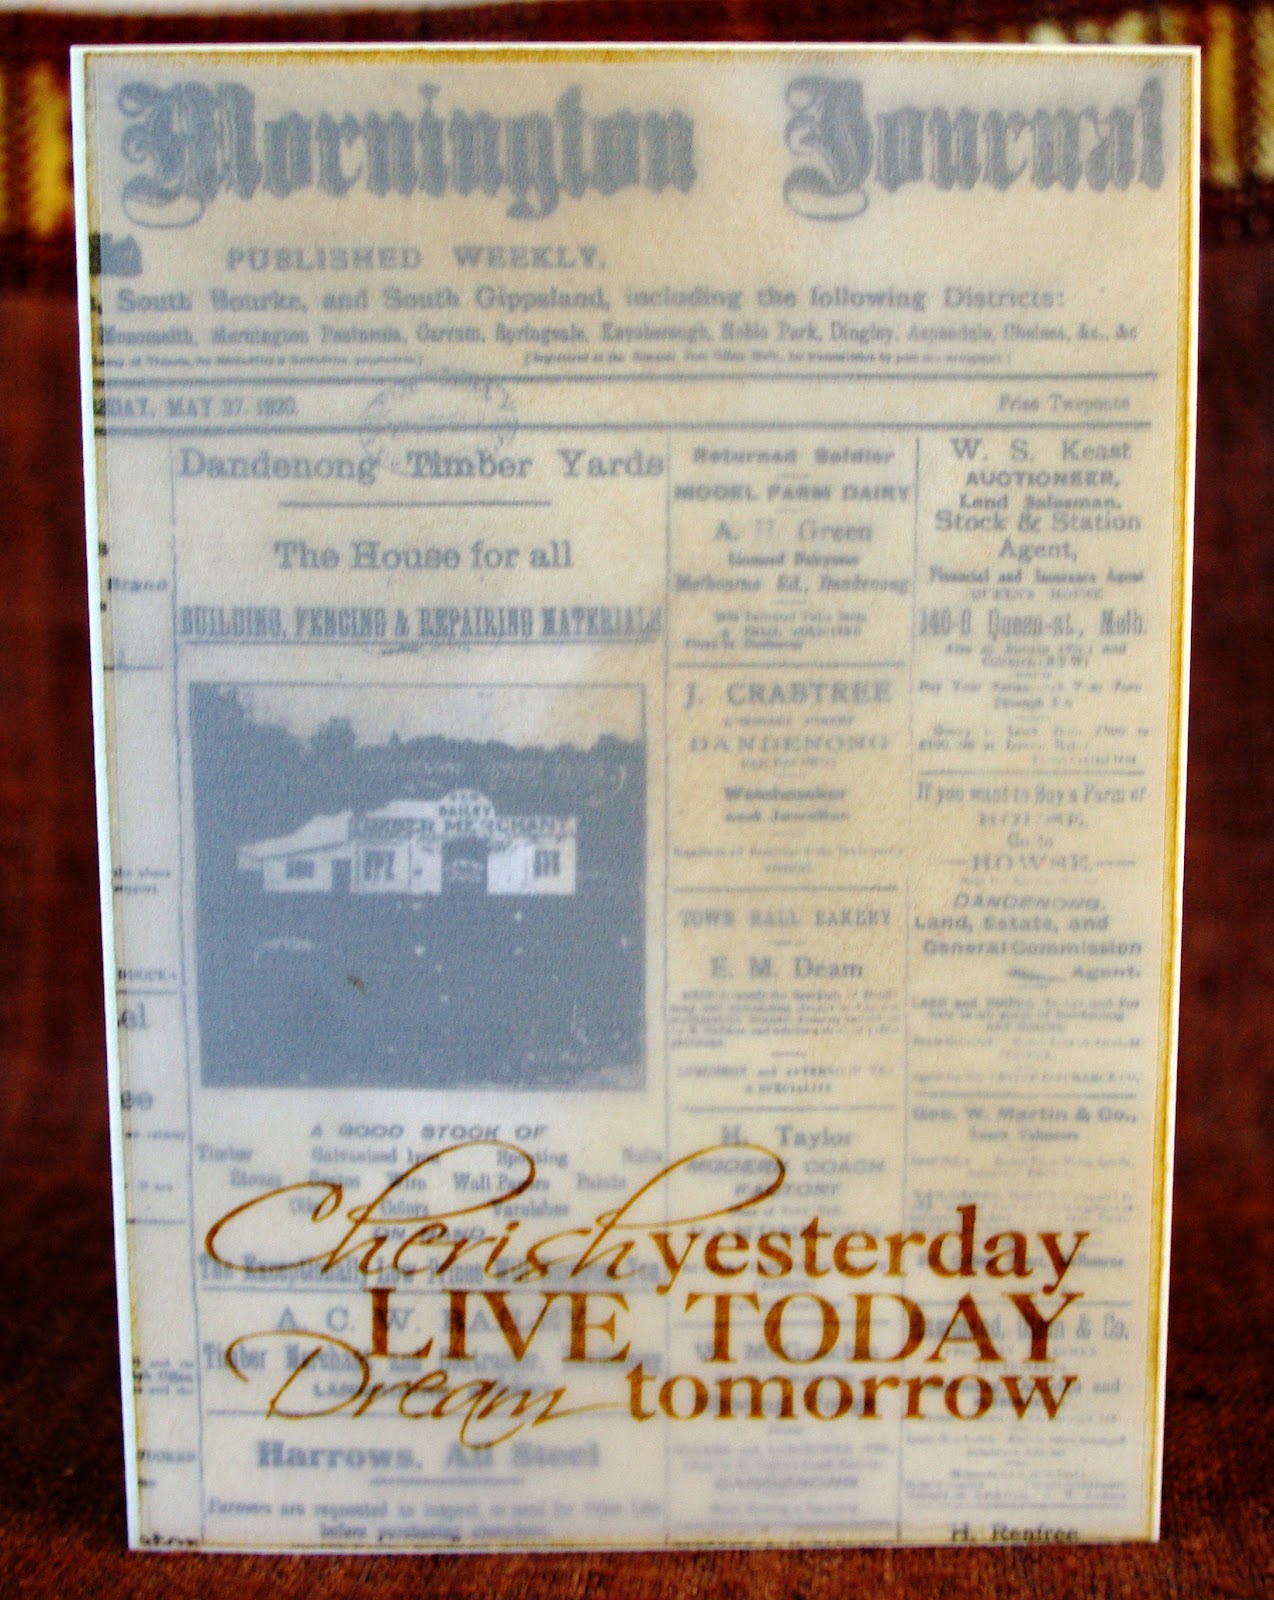
Kaszazz - Cherish & Dream

Last week we stayed in a cottage which had the most unusual paintings on the walls.  They had an aged newspaper background and beautiful artwork painted over it.  This gave me an idea for the background on a set of cards.

I searched on the internet for old papers and could not find any free South African ones but thought an Australian one would be the next best bet.  I printed a couple of pages out, cut one down to size and Distress inked it.  I then layered a type of vellum I had in my stash and stamped the Kaszazz Cherish & Dream sentiment in Coffee Archival ink onto it.

For the inside I used a smaller piece of the newspaper I had over and also Distress inked it with Antique Linen and Brushed Corduroy.  On the right hand side I die cut from a Spellbinders Grand Labels 11 using my trusty x-rays to create a template.  Using Brushed Corduroy again I sponged around the edges.  I think I am going to cut out a whole lot more templates using my old x-rays and Spellbinders dies.  The sponge applicators work well on them and it gives a quick and easy insert.

Tuesday, February 14, 2012

Inkadinkado - For the Birds

Although I am not a bird person I seem to have a number of bird stamps.  My main problem is what colours to use for the birds. On this one I decided to colour them in my own choice instead of trying to research what type of birds they are, look them up on the internet and get what colour they are supposed to be.  From here on out I am taking artistic license with birds - they are going to be all different colours !

The background is a Stamposaurus stencil on which I used Antique Linen Distress ink and a stencil brush.  The sentiment is from a Clear Dollar set called Something to Crow About and it was punched out using the Stampin Up Word Window punch.  The image was coloured in using a blender pen and markers.

Sunday, February 12, 2012

Tim Holtz Components Collection - Flutter

I managed to get my hands on a couple of Tim Holtz Components Collection stamps and decided to use this one for another simple card.  The image is stamped using Archival Cobalt ink and I used a variety of Distress inks to give it a bit of colour.

The stamp fits into a Spellbinders Deckled Edge Rectangle and I popped the image onto an embossed card front.  The sentiment is from Clear Dollar Something to Crow About and has been framed with Stampin Up punches.

Thursday, February 9, 2012

Stampin Up - Engraved Greetings - Birthday

Apologies for being absent earlier this week.  Had computer problems and then went away for a couple of days. 

This is another card using the Stampin Up set Engraved Greetings.  The sentiment is die cut using Spellbinders Deckle Edged Rectangles in 2 colours with the border being from an old Cuttlebug cut and emboss die.

Thursday, February 2, 2012

Flourishes - Kids Play - girl

I find the key to making quick and simple cards for me is to identify a stamp set, in this case Flourishes Kids Play and make a couple of cards from the various images in the set. 

This image did not stamp out as well as I had hoped and I used a black marker to go over the parts which were a bit too light.  I think I have a problem with pressure on some stamps so perhaps I was to blame this time.  I used Distress inks - Peeled Paint and Bundled Sage for the grass and cut out the image using a Spellbinders Circle.  The die using the green cardstock behind the circle is from Spellbinders Lacey Circles.

The sentiment and the die used to frame it is from Whimsy Stamps.  The die is Notables 2 and the sentiment set is Friendship Notables 2.