It was a bit of a mission to get my hands on this die as I could not find it anywhere in the UK and ended getting it from the US. I used it this Christmas to mass produce cards. I teamed the figures up with a Marianne D die for the lantern (bottom half trimmed off), Creative Memories background paper and a sentiment from a Peachy Keen set.
Showing posts with label Marianne D. Show all posts
Monday, December 26, 2016
Thursday, November 24, 2016
Christmas Ornament - Cottage Cutz Mouse w/Sunflower
I just love how this ornament turned out. The mouse is so cute !
For the background I die cut 2 x Spellbinders Scalloped Circles out of white felt. The sleigh is a Marianne D Creatables die, the mouse is from Cottage Cutz Mouse w/Sunflower and the reindeer antlers were taken from the Cottage Cutz Festive Owls set. All the die cuts were done out of card stock and adhered on with Felt Glue. The "reins" were just to lines of embroidery thread. I did add a little glitter glue onto the sleigh to jazz it up a bit.
Once the glue was set I stitched the two scalloped circles together using a zig zag pattern and added some filling in to give it a bit of body. With card stock being rigid it is best not to add in too much filling.
Labels:
Cottage Cutz dies,
Marianne D,
Spellbinders
Sunday, August 7, 2016
Card Gift Container
Friday, December 12, 2014
Tonic Balloon Weight Keepsake Box Die
I have been really busy in my craft room scrapbooking Xmas gifts. Need to scrapbook 40 pages in all by the 25th and I am only just under half way there ! The upside is the pages are 8" x 8" which does make it a little easier. Couple that together with larger photo's and it is relatively easy.
The other day on a visit to a local craft store I spied this Tonic die which I convinced DH to buy as a Xmas gift for me. The die was not the easiest to cut out - I needed to use the Big Shot Pro and seem to have a bit of uneven pressure on the rollers. Had to do a bit of hand trimming to finish it off. Also struggled with the underneath part as it did not make sense. Usually I am good at fathoming things out but this seemed to defy logic. I think I need to try it again. The Spellbinders scalloped and classic ovals with the Marianne D Rudolph die were used on corresponding sides to cover over an experiment which did not work out.
The idea of this box is that you cut out all four sides with a Tonic die (none of my extensive die collection worked) to get a lantern effect. Then pop in a battery tea light, attach to a balloon and send off into the sky. Not something I would do so I will stick to using it as a treat box.
Labels:
Marianne D,
Spellbinders,
Tonic Studio dies
Thursday, November 13, 2014
Marianne D - Skates
The background paper on this card is Bo BunnyFather Christmas Stripe. The sentiment is die cut using a Stampin Up oval punch but I cannot remember where the sentiment came from. I did it a long time ago and popped it into my stash without writing on the back which stamp I used.
The die cut is from a Marianne D die called Skates
Friday, August 1, 2014
Gift box using One Sheet Box technique
For the one sheet box technique I went onto Splitcoast Stampers to have a look at the tutorial and get the scoring measurements. I did adapt the measurements as my sheet of card stock was a slightly different size. I would recommend you use a sheet of normal printer paper first to practice on.
All the paper used was from my stash. On the pink background I used a Martha Stewart border punch Doily Lace Edge. The apron is a die from Marianne D called Apron and the ribbon used is a Stampin Up one. On the reverse side of the box I used MFT Gift Card Pocket Vertical, inserted a Hero Arts Long & Cute tag and embellished the outside with a sentiment from Lili of the Valley die cut with a Spellbinders Circle.
When using the box as a gift I intend popping in 2 small glass jars with either homemade spice mixes or jams.
Whiff of Joy - Snowburst
I recently picked up this Whiff of Joy Snowburst die in an online sale. My first try at it was a bit frustrating but I persevered with a slightly thicker card stock, plenty of masking tape to hold the die down and multiple runs at varying angles through the Big Shot.
Adhering these delicate dies are always a problem for me so I stuck double sided tape (small pieces) to the larger areas and used a glue pen for the rest. The flowers are from a Marianne D die called Poinsettia. The sentiment is MFT Stitched Stockings in Archival Cobalt ink die cut using MFT Fishtail Flags Stax.
Wednesday, July 2, 2014
Thank you card
I made 5 of these cards to go into a gift box for a friend who is having a baby. When looking for a design I went for a simple card with a touch of softness.
The sentiment is a Cuttlebug one and was die cut using Stampin Up Apricot Appeal card stock. The ribbon is also Apricot Appeal and it was threaded through a Marianne D Ribbon 1 die. The die cut behind that is from MFT and is called Bookmark Duo.
Labels:
Cuttlebug,
Marianne D,
MFT Die-namics,
Stampin Up
Sunday, May 11, 2014
Hero Arts - Timely Bird
Apologies for not posting for a while but we moved house, again. Hopefully, this will be the last move for a while !
On a recent shopping trip up to Camden in London we bought a some items from an Asian store and they came wrapped in a really interesting couple of sheets of handmade tissue paper. I decided to experiment with it and used 3 colours of Carole's Craft Shimmer Magic spray misters for the background. I then used Versafine Onyx Black ink for the Hero Arts Timely Bird stamp and wrapped the tissue paper around a square piece of card stock.
The black die cut is from Go Kreate 6 x 6 Frame Wavy #1 and the decoration at the top of the card is a Marianne D Anjas Vintage Decoration die out of CM Storybox Everyday paper. With still being a little upside down in the craft room I could only find a blue lid to photograph the card on, not sure it was the right thing to do !!
Labels:
Creative Memories,
Go Kreate,
Hero Art,
Marianne D
Monday, March 3, 2014
Marianne D - Silhouette Couple
The recipe for this card is simple : 2 Spellbinders Circles, 1 Cuttlebug embossing folder, 1 Silhouette Couple to which you add a sentiment from Hero Arts Everyday Sayings. Creating this card has reminded me to go into my stash and try to use up my large drawer full of blank cards. Need to start to get my supplies down to a manageable level before we move again !
Tuesday, July 9, 2013
Marianne D - Cupcake
This is a clean and simple card cased from Kristina Werner's blog. I used the following supplies :
Spellbinders Petite Scallop Circles
Spellbinders Circles
Marianne D - Cupcake die
MFT - First Place Award Ribbon stamped with sentiment from Hero Arts Find Joy stamp set
The pink gingham paper is from my stash and it has been edged with Victorian Velvet Distress ink.
Spellbinders Petite Scallop Circles
Spellbinders Circles
Marianne D - Cupcake die
MFT - First Place Award Ribbon stamped with sentiment from Hero Arts Find Joy stamp set
The pink gingham paper is from my stash and it has been edged with Victorian Velvet Distress ink.
Labels:
Hero Arts,
Marianne D,
MFT Die-namics,
Spellbinders
Thursday, May 23, 2013
Peachy Keen - cute teddy
This Peachy Keen teddy is from the set PKSC - 13 January 2013 and was coloured in using Distress Stains and a paint brush. The cheeks were finished off with Pebbles Inc Ikan'dee Pearlescent Chalks applied with a small stencil brush.
All the cardstock used was scraps from my stash. The circles are cut from a Go Kreate Circle die, the pocket was hand cut using a Cottage Cutz die as a template and the blue cardstock on which the sentiment is stamped is a Marianne D die called Circles CR1201. The sentiment is from the Hero Arts set Find Joy and was stamped with Archival Sepia ink.
Labels:
Go Kreate,
Hero Arts,
Marianne D,
Peachy Keen
Friday, April 12, 2013
Marianne D - Bird Branch Large
Recently in my art class we experimented with watercolour paints and cling film. I did this background by painting on watercolour paper, laying cling film on top and scrunching the cling film up. It then needs a heavy weight on it and leave for 24 hours to dry. I die cut the background using Go Kreate Frame Wavy #1.
The Marianne D die, Bird Branch Large, was die cut in white and the sentiment - Kaszazz Lucy's stamps 2019 LM Greetings - was stamped with Aquamarker Fern Green and die cut with a Spellbinders Circle.
Monday, April 8, 2013
Art Impressions - Birthday Whoots
Starting from the bottom layer - Creative Memories Storybox Jewell, the Sizzix Tags Rounded, 2 green Marianne D Branch Forest, Art Impressions Birthday Whoots set coloured in with aqua pencil crayons and markers. The sentiment is Clear Dollar Something to Crow About punched out with Stampin Up Word Window.
Labels:
Art Impressions,
Clear Dollar,
Creative Memories,
Marianne D,
Sizzix,
Stampin Up
Monday, October 8, 2012
Hero Arts - Sending Holiday Cheer
I was wanting to make a Christmas card and bring in different colours. The gingham paper is from W& M - CB124 and I die cut it using a Go Kreate die called Large Frames Plain Square.
The wreath and holly are from Marianne D - Holly Garland which I left in the die sponging Distress ink through the holes. The stamp is a Hero Arts one from the Sending Holiday Cheer set and I used a variety of markers to colour it in. The sentiment is from the Hobby Art Clear set called Christmas Greetings.
Labels:
Go Kreate,
Hero Arts,
Hobby Art,
Marianne D
Friday, October 5, 2012
Penny Black - Christmas Every Day
I recently acquired this Penny Black Christmas Every Day stamp set from Simply Creative here in Cape Town.
Using Black Archival ink I stamped the image onto water colour paper. Once I had decided to paper piece the pyjama bottoms it made it easier to colour coordinate the top using Weathered Wood Distress marker and adding dots made with a white gel pen. The teddy was coloured in with Tombow markers and a blender pen. I also used Tombow markers for the tree and base. The ornaments were done with Spica pens. I then popped the die cut back into the die (Spellbinders Label 2) and sponged it with Weathered Wood Distress ink.
The 2 dies behind the image are Marianne D Square for the cream one and the patterned one is Spellbinders Lacey Squares.
Monday, October 1, 2012
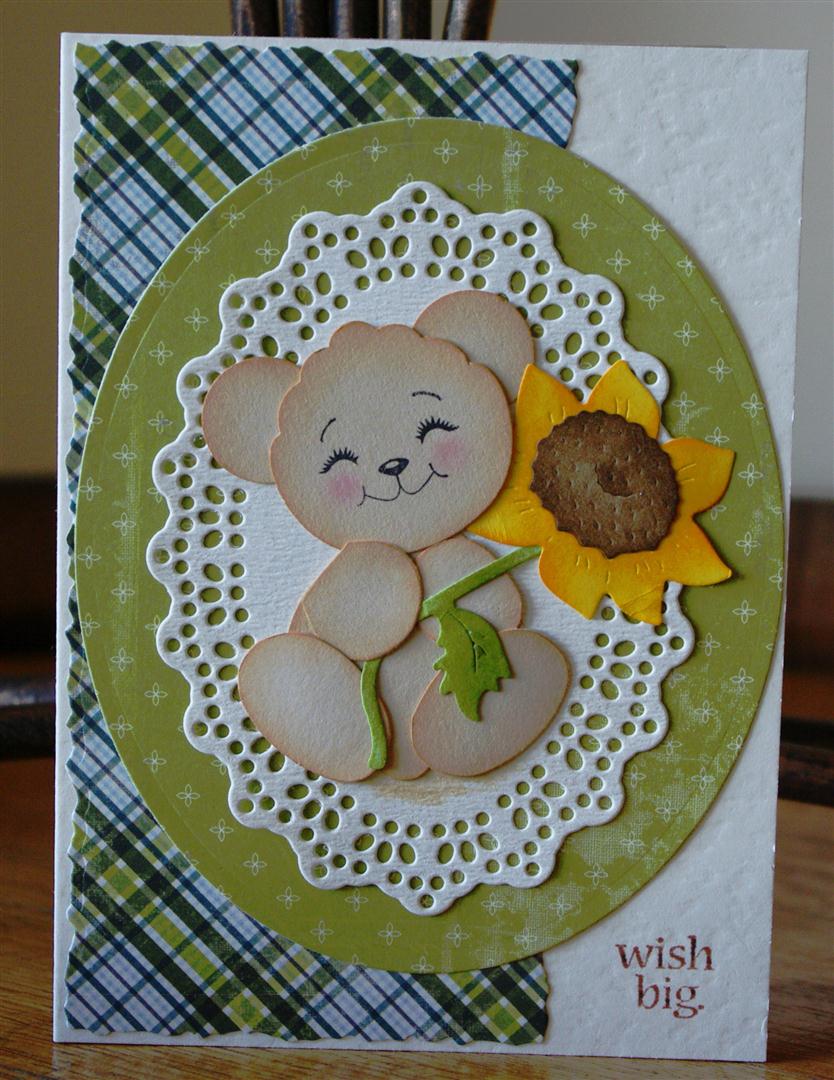
Punch Art - Teddy Bear
This delightful bear was cased from Kim Score's blog Paper Punch Addiction - for instructions see here . It was designed to be made with one punch only - the Stampin Up Blossom Petals Builder. I did deviate by using a ¾" circle punch for the ears.
The bear punch outs were all edged with Distress Ink before assembling. The cute face is from a Peachy Keen set PK-754 Critter Faces Set A Medium and the rosy cheeks are done using chalk and a very small stencil brush which I also bought from Peachy Keen.
The sunflower is from a Cottage Cutz die called Mouse w/Sunflower and it was coloured using a sponge and Distress Inks. The sentiment is from the Penny Black stamp set called Micey Day and I stamped it using Archival Ink - Coffee.
The die behind the bear is Marianne D - Oval CR1204, behind that is a Go Kreate Oval die. Both patterned papers are from an Authentique Paper pad called Loyalty.
Labels:
Cottage Cutz dies,
Go Kreate,
Marianne D,
Peachy Keen,
Penny Black,
Stampin Up
Monday, August 20, 2012
Cottage Cutz - Baby Buggy
This cute baby buggy from Cottage Cutz is easy to assemble. The main buggy is sponged using Distress Ink Brushed Corduroy and on the pink frills I used Spun Sugar. The little face is a three quarter inch circle, the stamp is from the Peachy Keen set called Wide Eyes Kids Face Assortment and the hair is part of a small Stampin Up punch. The blush on the cheeks is a dab of chalk.
The circles used are cut from the 2 largest Spellbinders Large and Small Circle set. The die behind the circles is Circles from Marianne D. The background paper is from a pad called Mini-Paper Collection by FabScraps.
Labels:
Cottage Cutz dies,
Marianne D,
Spellbinders Circle,
Stampin Up
Monday, August 13, 2012
Cottage Cutz - Baby Cradle
The baby release from Cottage Cutz is just darling and was exactly what I needed to create more baby cards.
Starting with the cradle I have a tip for lining the pieces up - even though the made up version is bigger than that shown on the Cottage Cutz packaging, you can get a better idea of how to line the legs up if you put your one on top of the picture. This I will do next time as my cradle legs are just slightly skew !
The cradle was placed onto a Marianne D die Scalloped Circle and then matted onto a Go Kreate die called Wavy Frame #1. The panda is from the Inkadinkado set Baby Animals and the sentiment is a SU stamp from Itty Bitty Banners die cut with SU Framelits - Bitty Banners.
Labels:
Cottage Cutz dies,
Go Kreate,
Inkadinkado,
Marianne D,
Stampin Up
Wednesday, July 18, 2012
Marianne D die - Cupcake
A plain and simple card using the Marianne D die called Cupcake. I really like this die and think it is one of the better cupcake dies on the market.
The cupcake is matted onto 3 different sized Spellbinders Labels Three. The sentiment is from the Hero Arts set called Birthday Sayings.
Subscribe to:
Posts (Atom)